Anmerkungen [Start] [Inhaltsverzeichnis]
Voraussetzungen:
Ein eigenes Konto bei https://www.nexusmods.com
Zusammenfassung:
In dieser Anleitung werden mit zirka 200 Modifikationen (=Mods) die Bugs gefixt, die im Spiel enthalten sind. Ich meine damit wirklich alle hier zusammen getragenen Mods. Wenn ihr diese Liste nur überfliegen wollt, um neue Mods kennenzulernen, dann solltet Ihr auf jeden Fall diejenigen in eure Mod-Liste aufnehmen, hinter denen ich "(empfohlen)" geschrieben habe. Ich sehe alle Mods in dieser Anleitung als essenziell an, um Morrowind im Vanilla-Stil durchzuspielen.
Info:
Die Bilder stellen nicht den grafischen Standard eines gemoddeten Morrowind dar.
Vorschau:
In dieser Anleitung fehlen mir noch sehr viele gute grafische Verbesserungen und zusätzlicher Content, um die Welt zu erweitern. Daher wird diese Anleitung mit der Zeit erweitert werden.
Musik beim Modden:
Wenn ich Bethesda-Spiele modde, höre ich gerne Musik, die mich bereits in die Welt
hineingleiten lässt. Hier meine private Playlist auf Spotify:
Bethesda CreationKit sessions
https://open.spotify.com/playlist/73qWsUjNYWvdo5rbiyEOmm?si=e61aef8aac04499f
Backups
In den letzten Jahren sind immer mal wieder Mods oder ganze Seiten aus dem Internet verschwunden. Beispielesweise "Planet Elder Scrolls" (Infos), oder ganz aktuell "Great House Fliggerty" und mw.modhistery.com (Infos). Löscht also niemals eure herunter geladenen Mods! Vielleicht könnt ihr damit noch mal in 5 Jahren die gesamte Modding-Gemeinde retten.
Vorbereitungen [Start] [Inhaltsverzeichnis]
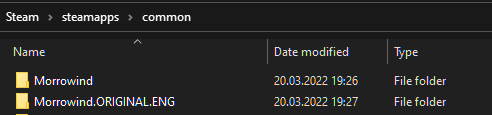
Sicherung des Original-Spiele-Verzeichnisses anlegen
Ich erstelle im Steam-Spiele-Ordner eine Kopie und benenne diese Kopie in
Morrowind.ORIGINAL.ENG um.
Der Inhalt des Original-Spiele-Ordners „Data Files“ von Morrowind sieht nach der
Erst-Installation wie folgt aus:
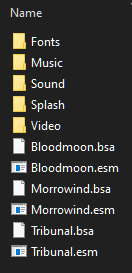
Im „Morrowind\Data Files“-Verzeichnis sollten nur die im Bildschirmfoto zu sehenden
Verzeichnisse und Dateien existieren, bevor wir mit dem Modden beginnen.
Ich lösche ausserdem den Splash Ordner mit den hässlichen „loading screens“.
Die offiziellen Plugins von Bethesda werden wir nicht installieren,
da diese bekanntermaßen in einer sehr schlechten Qualität zur Verfügung
gestellt wurden. Wir benutzen diese hier also nicht:
https://en.uesp.net/wiki/Morrowind:Plugins
Stattdessen werden wir relativ früh im Verlauf dieser Anleitung die Mod
Unofficial Morrowind Official Plugins Patched
installieren.
Morrowind Code Patch (MCP) [Start] [Inhaltsverzeichnis]
URL: Morrowind Code Patch
Die game engine war schon immer fehlerbehaftet. Wir laden daher den
folgenden binary-patcher herunter und extrahieren alle Dateien in das
Morrowind Spiele-Verzeichnis:
Data:
https://www.nexusmods.com/morrowind/mods/19510?tab=files
Nach der Installation führen wir noch nicht die Anwendung Morrowind Code Patch.exe aus.
Ich werde im weiteren Verlauf schreiben, wann das Programm gestartet werden soll.
Wenn ihr nicht die englischen Sprachdateien eingestellt habt,
dann werdet ihr nach dem Installieren von MCP Probleme beim Spielen haben,
da wichtige Inhalte für den
Spielverlauf nicht bei den Sprachdialogen angezeigt werden.
Morrowind Code Patch beta-version
(MCP beta)
[Start]
[Inhaltsverzeichnis]
URL:
MCP Skunk Works
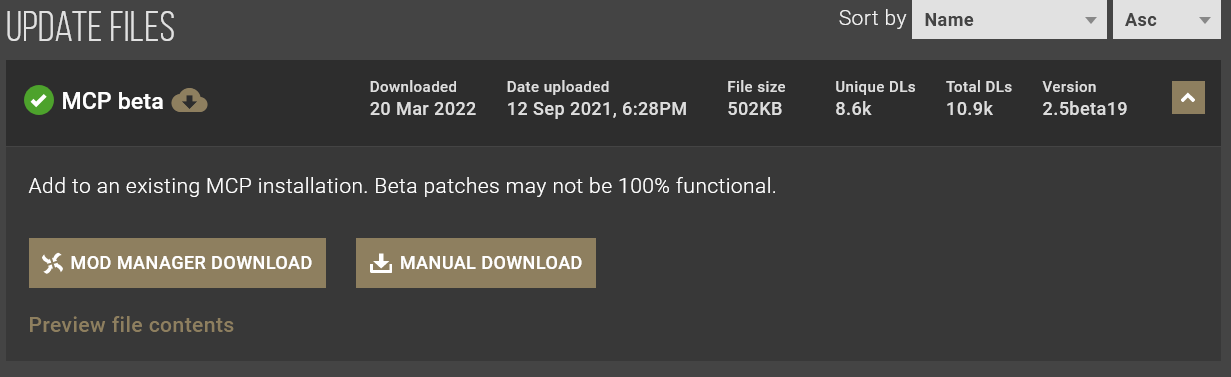
Data:
https://www.nexusmods.com/morrowind/mods/26348/?tab=files
Morrowind Code Patch starten
(Morrowind.exe patchen)
[Start]
[Inhaltsverzeichnis]
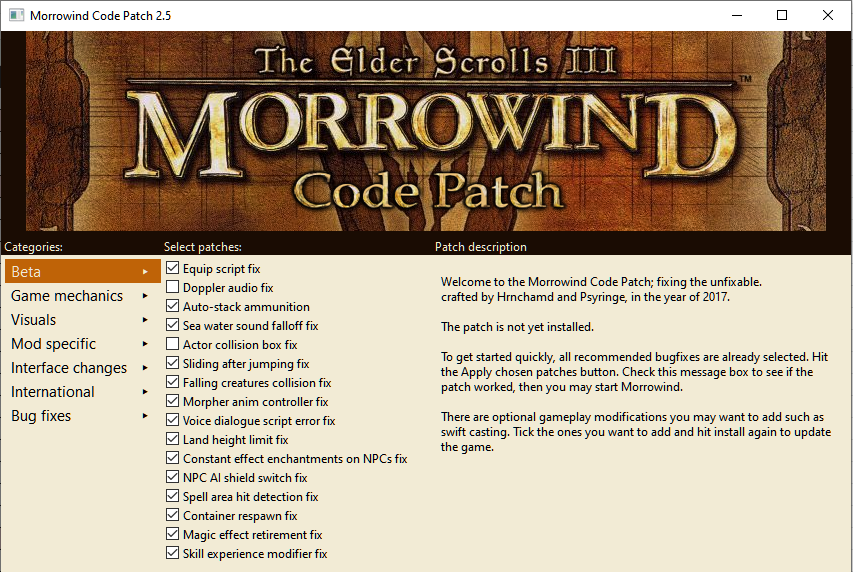
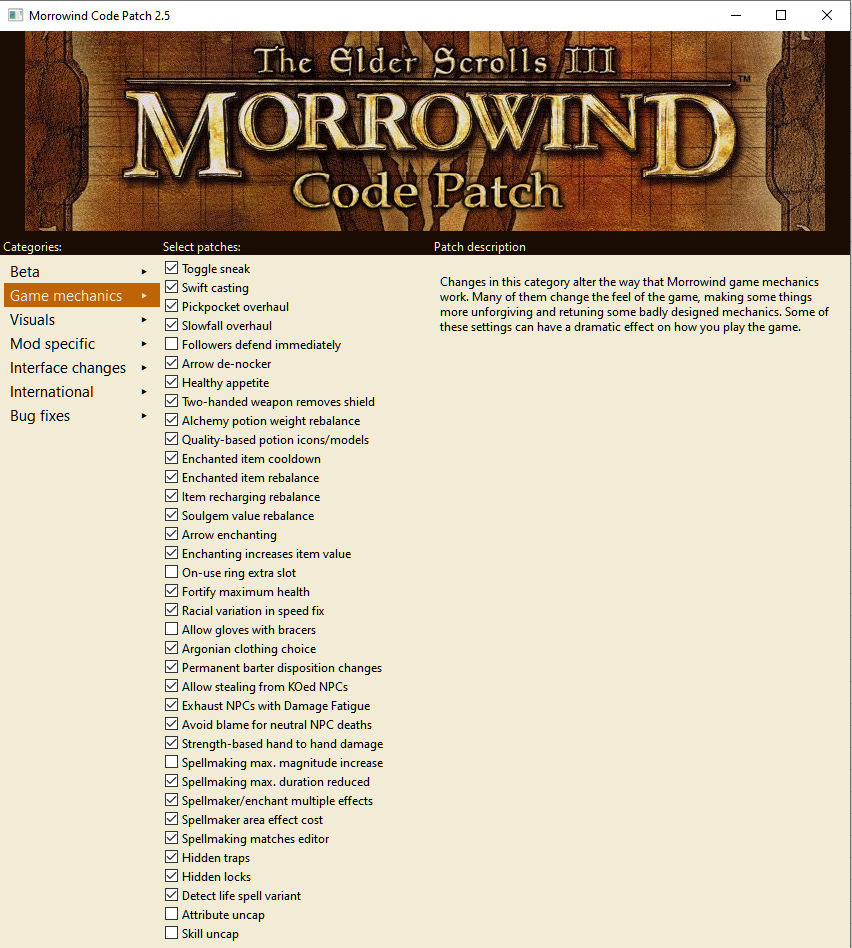
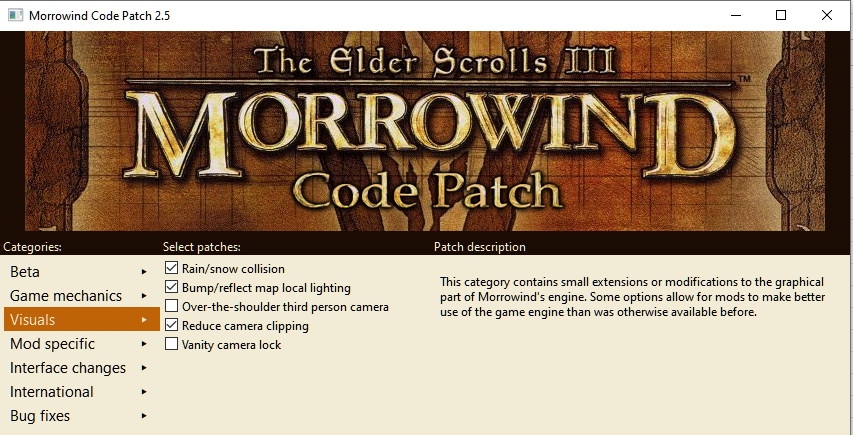
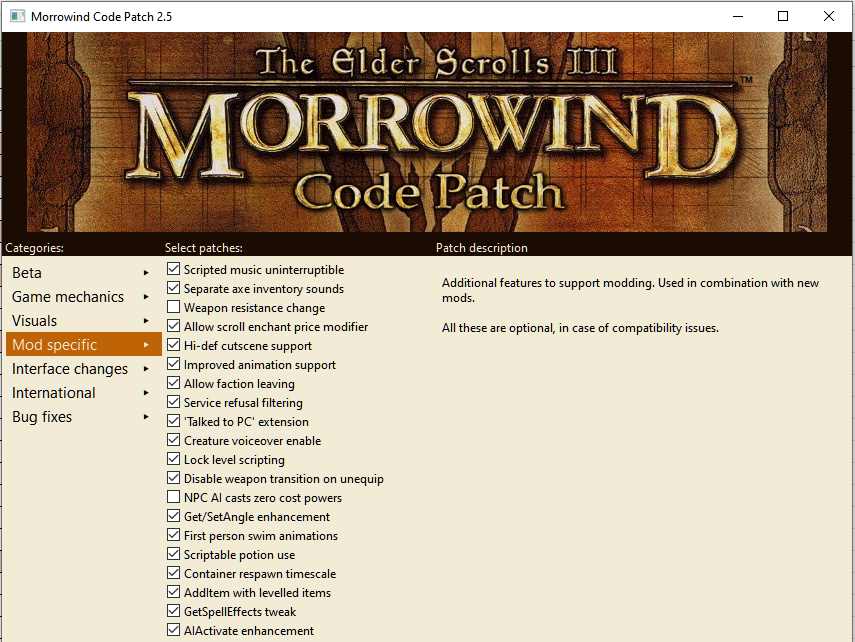
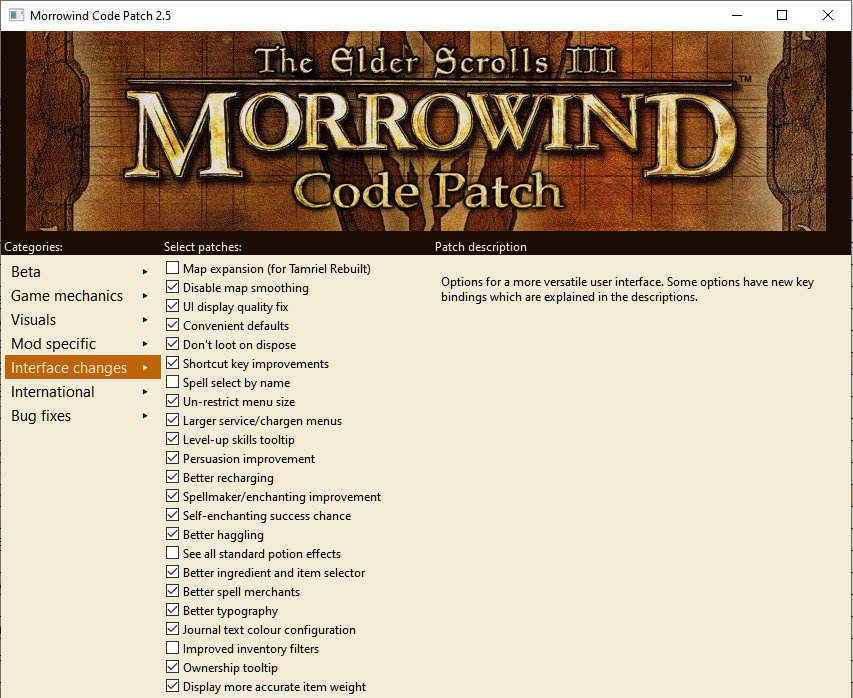
Wir starten jetzt die „Morrowind Code Patch.exe“, welche wir im Morrowind-Verzeichnis vorfinden. Folgende Einstellungen nehmen wir vor...
Beta Tab
Game mechanics Tab
Visuals Tab
Mod specific Tab
Interface changes Tab
Bug fixes Tab
Hier wird alles aktiviert
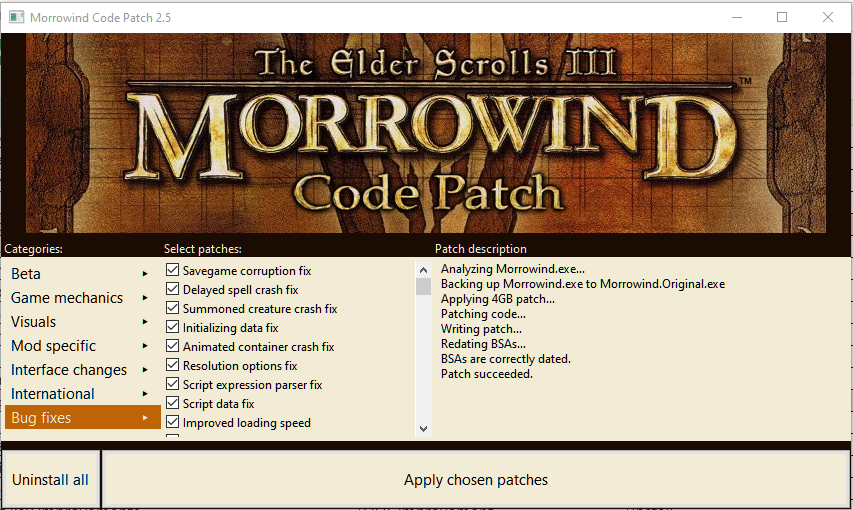
Zum Abschluss werden nun alle Änderungen angewendet, indem wir
auf die Schaltfläche "Apply chosen patches" drücken.
Danach kann das Fenster geschlossen werden.
Morrowind Graphics Extender XE (MGE XE)
+ MWSE
[Start]
[Inhaltsverzeichnis]
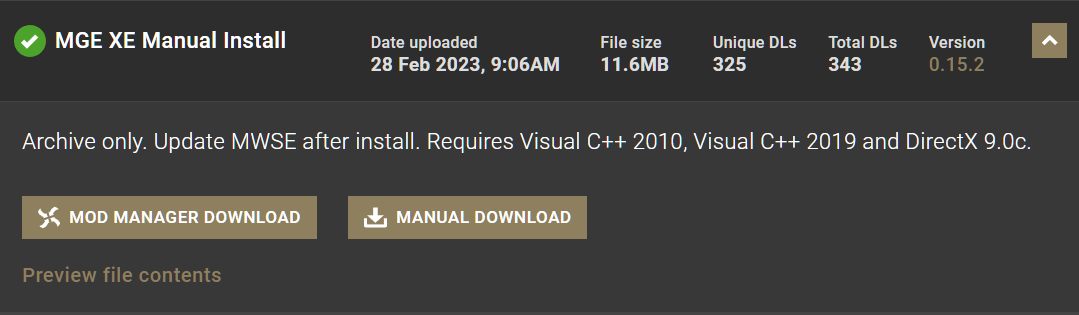
URL: MGE XE
Die aktuellste Version des grandiosen „MGE XE“ benötigt die beta-Version
des „Morrowind Script Extender“ (MWSE). Deswegen wird mittlerweile „MGE XE“
zusammen mit MWSE ausgeliefert.
Wir laden zuerst einmal das zweite Paket unterhalb von MAIN FILES herunter:
„MGE XE Manual Install“.
Data:
https://www.nexusmods.com/morrowind/mods/41102?tab=files
Wir entpacken alle Dateien in das Morrowind-Verzeichnis.
Die folgenden Infos müssen wir jetzt unbedingt beherzigen, bevor wir weiter machen:
„Update MWSE after install.
Requires Visual C++ 2010,
Visual C++ 2019 and
DirectX 9.0c.“
Falls ihr also noch nicht die drei letzt-genannten Pakete installiert habt,
muss dies jetzt von euch ohne meine Hilfe durchgeführt werden.
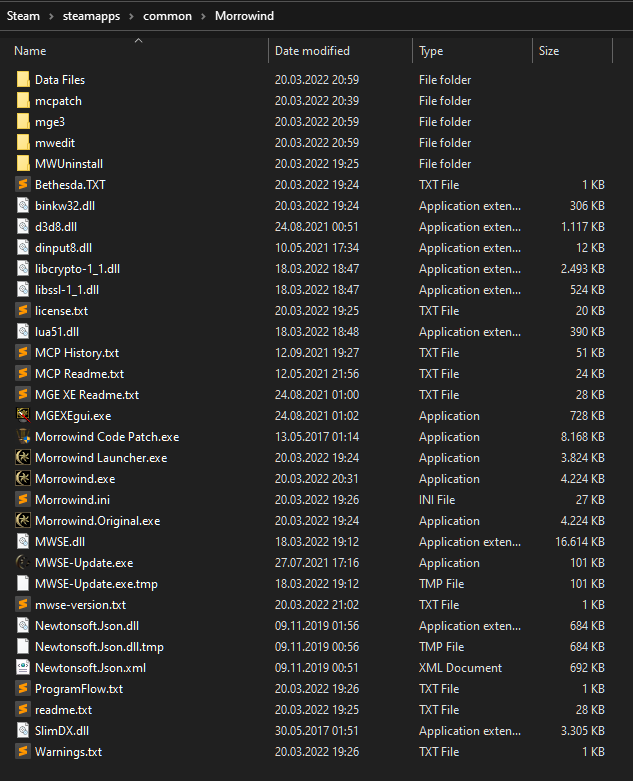
Wir starten jetzt die MWSE-Update.exe.
Nach dem Update sieht unser Morrowind-Verzeichnis wie folgt aus (siehe Bildschirmfoto).
Abschliessend löschen wir noch im Unterverzeichnis „Data Files“ das
„Elder Scrolls Plugin“ (esp) „XE Sky Variations.esp“. Zum Einen ist dieses Plugin
veraltet und zum Anderen werden wir im Verlauf dieser Anleitung eine moderne
Variante durch die Mod „Weather Adjuster“ installieren.
abot Distant Static Overrides - Necro Edit 2.0 [Start] [Inhaltsverzeichnis]
Damit MGE XE auch mit Distant land objects arbeiten kann, benötigen wir jetzt die
nächste Mod „abot Distant Static Overrides - Necro Edit 2.0“.
Da es sich um einen Community-Patch handelt, welcher über eine Dropbox zur
Verfügung gestellt wird, sollte man sich für diese und andere Mods ein
Backup-Verzeichnis anlegen.
Denn es kann sein, das solche Dateien irgendwann aus dem Netz verschwinden, weil der
Autor nicht mehr unter uns weilt. Dies ist in den letzten Jahren immer wieder vorgekommen,
weswegen sich Modding-Seiten wie nexusmods.com mittlerweile ein Versionierungssystem
einbauen.
DL:
https://www.dropbox.com/s/j25igx3p0m5bejs/Abot%20Distant%20Statics%20Override%20-%20Necro%20Edit%202.0.7z?dl=1
Wir extrahieren alle Dateien, welche im Unterverzeichnis „necro_distant_objects_override“
liegen, direkt in das Unterverzeichnis mge3 im Morrowind-Verzeichnis.
Mod Organizer 2 (MO2) [Start] [Inhaltsverzeichnis]
URL:
Mod Organizer 2
Der „Mod Organizer 2“ (MO2) ist der modernste und komfortabelste Mod Manager, der
den Menschen auf diesem Raumschiff geschenkt wurde, damit Realitäten
gemodded werden können.
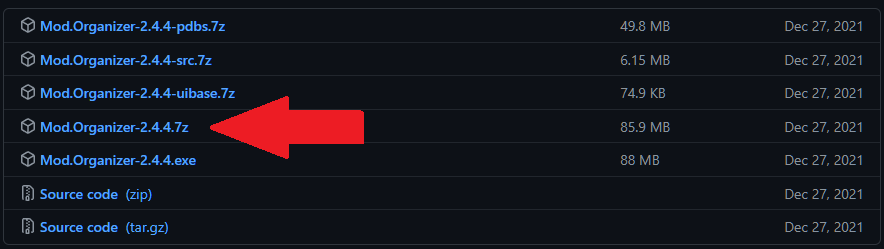
Wir laden die Version 2.4.4 (oder neuer) von der Seite:
https://github.com/Modorganizer2/modorganizer/releases
Achtung: Wir installieren in Windows
niemals Software unterhalb dieser beiden Ordner:
Program Files
Program Files (x86)
Denn ansonsten leiden wir unter der Windows-Krankheit UAC (user account
control).
Ausserdem ist es immer gut zu wissen, dass manchmal modding tools nicht
funktionieren, weil die Microsoft Windows realtime protection die Software
als Malware einstuft, ohne einen darüber zu informieren. Das hat mich schon
sicherlich einen Tag meines Lebens gekostet, immer wieder solche Probleme zu
eruieren.
Wenn also modding tools nicht funktionieren, dann testweise mal folgendes machen:
- Die Windows Einstellungen „All settings“ aufsuchen (Bildschirmfoto).
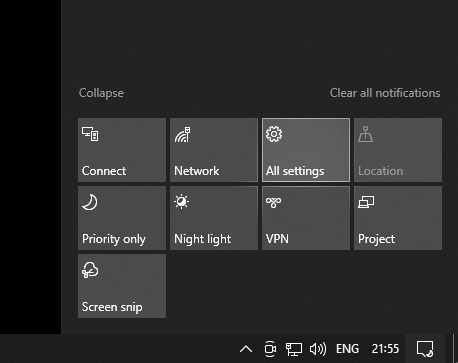
- „Update & Security“ aufsuchen (Bildschirmfoto)

- Im Abschnitt Windows Security wollen wir „Virus & threat protection“ anklicken (Bildschirmfoto).
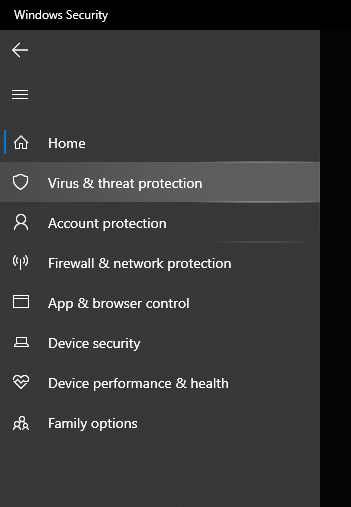
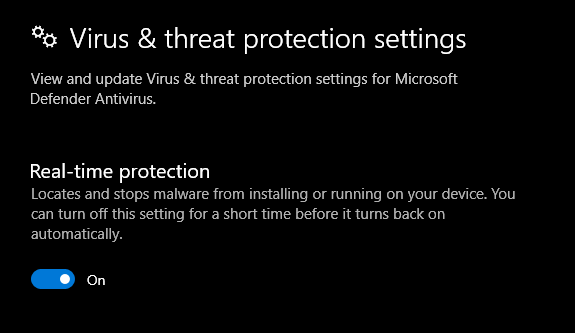
- „Virus & threat protection settings“ aufrufen.
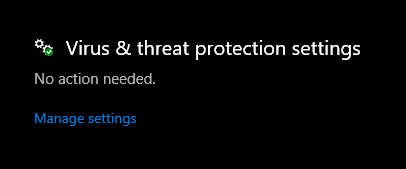
- Und nun zuguterletzt die Real-Time Protection abschalten.
Das ist unter Skyrim Moddern tatsächlich Gang und Gebe, weil immer mal wieder
vorher funktionierende Tools Tage später grundlos geblockt werden.
Ich habe auf dem Laufwerk D:\ eigene Verzeichnisse mit den Namen
| Pfad | Kommentar |
|---|---|
D:\Morrowind |
Hierunter liegen ModOrganizer2-Installationen |
D:\Morrowind\Morrowind_2022 |
Beispiel fuer einen Installationsordner fuer MO2 |
D:\Morrowind Downloads |
Hierunter speichere ich die Mods aus dem WWW |
D:\Morrowind Tools |
Hierunter installiere ich die Modding Tools |
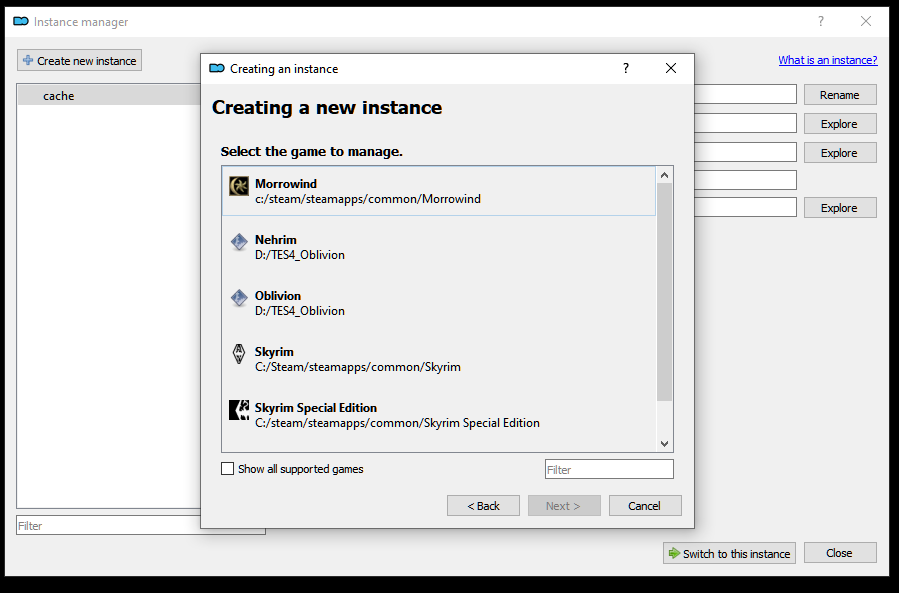
Der „Mod Organizer 2“ wird bei uns immer als portable-Instanz
installiert, um Konflikte mit parallel installierten ModOrganizer’n zu vermeiden:

Im folgenden Fenster wählen wir Morrowind aus (siehe folgendes Bildschirmfoto):
Wir geben den Pfad für die ModOrganizer2 Installation an und aktivieren „Show
advanced options“:

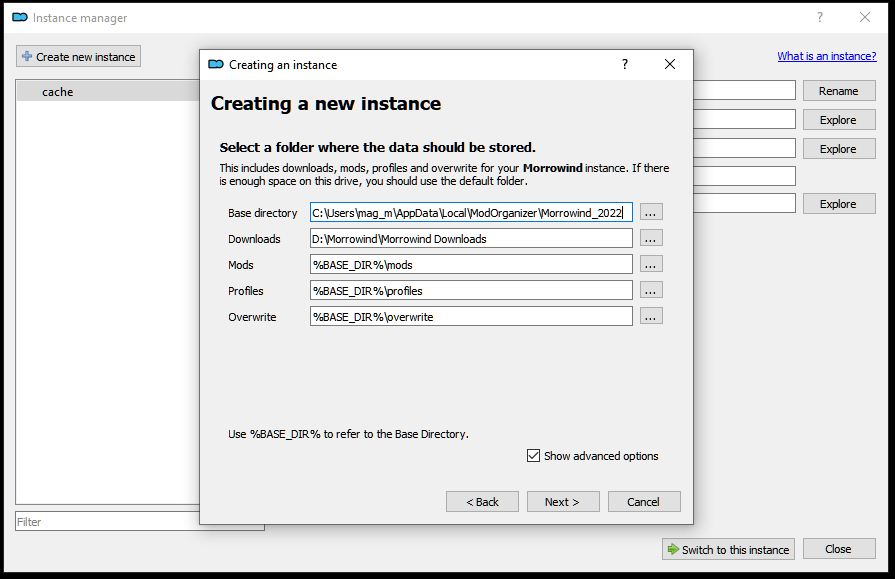
Und wir druecken auf „Next“ und „Finish“.
Der ModOrganizer2 startet mit der folgenden Ansicht:
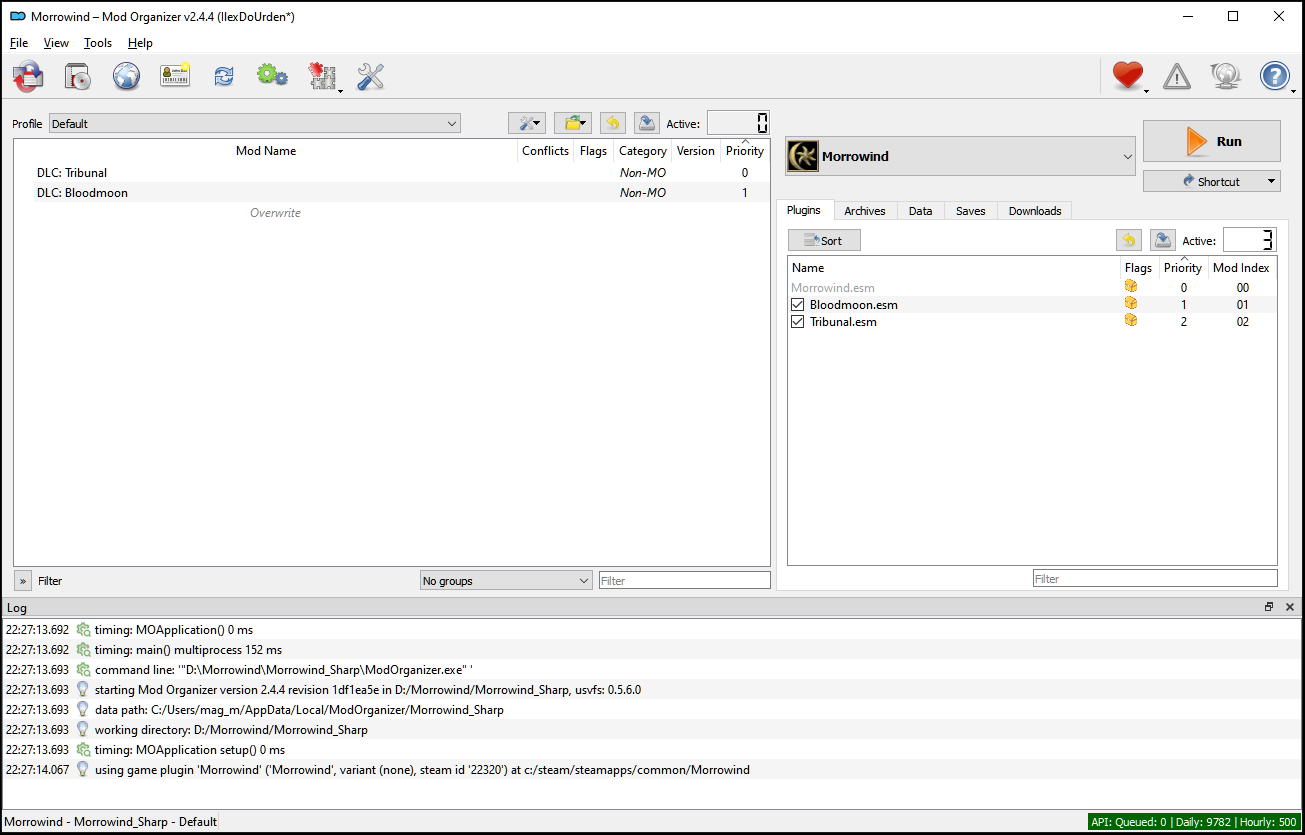
Das linke Fenster nennt sich das mod-panel und das rechte Fenster nennt sich das
plugin-panel.
Wenn wir Mods installieren, dann tauchen diese im linken Fenster auf. Wenn wir im
linken Fenster eine Mod aktivieren [Checkbox], welche Plugins enthält, dann tauchen
die Plugins danach im rechten Fenster auf.
Wenn im linken Fenster mehrere Mods installiert wurden, und zu diesen Mods im rechten
Fenster Plugins erscheinen, dann ist wichtig, in welcher Reihenfolge diese stehen.
Verschiebt also nie Plugins oder Mods, weil Ihr damit den Zustand eures gemoddeten
Spiels kaputt macht.
Immer dann, wenn ihr neue Mods hinzufügt, müsst ihr in vielen Fällen ein neues Spiel
beginnen. Fangt also nicht schon mittendrin mit dem Spielen an, sondern beendet erst
die gesamte Anleitung mit mir gemeinsam.
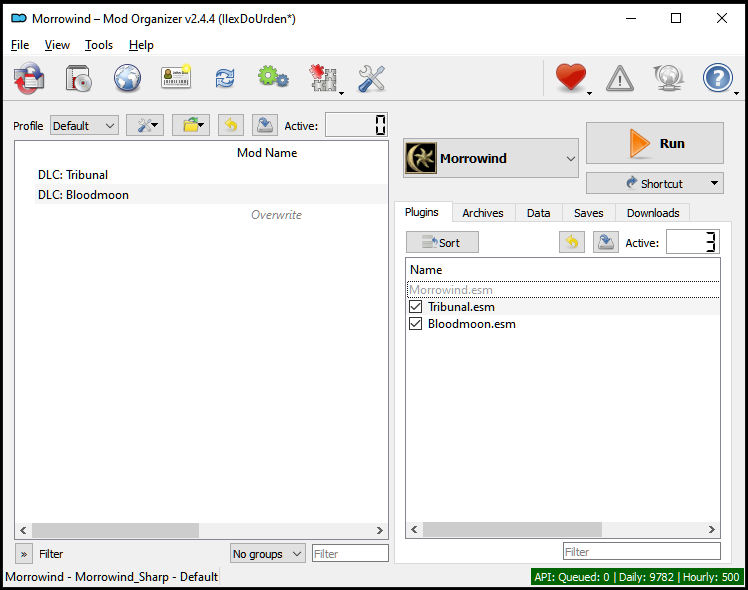
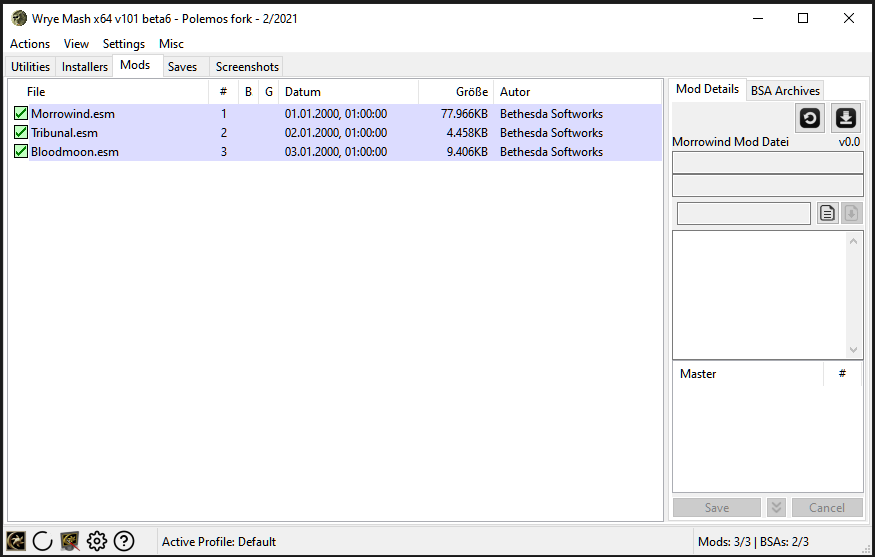
Zunächst korrigieren wir erst einmal die Reihenfolge der Plugins. Tribunal.esm muss vor
Bloodmoon.esm stehen. Das machen wir mit der Maus durch klicken und ziehen. Am Ende
sieht die Ansicht wie folgt aus:
Ich arbeite gerne mit dark theme user interfaces. Daher werde ich mir jetzt
noch unter Tools → Settings im Reiter „Theme“ den „Style“ auf
„1809 Dark Mode“ setzen und auf OK druecken.
Bei einer Bildschirmauflösung von 3440 zu 1440 Pixel habe ich nun auf der linken
Monitor-Hälfte meinen ModOrganizer2 und auf der rechten Hälfte meines
Monitors habe ich diese Anleitung oder meinen Browser.

Wir gehen jetzt in die Konfigurationsdatei morrowind.ini, welche vom
ModOrganizer2 über die folgende Schaltfläche erreicht wird:

und klicken auf den „INI Editor“. Wir ändern nun darin die folgenden Werte:
[Weather Rain]

						Rain Diameter=1200

						Max Raindrops=1500


						[Weather Thunderstorm]

						Rain Diameter=1200

						Max Raindrops=3000


						[Weather Snow]

						Snow Diameter=1600

						Max Snowflakes=1500
Mit CTRL+F können wir im INI-Editor suchen. Achtet bitte darauf, das die Werte mehrmals
in der Datei existieren. Der Wert muss unterhalb des richtigen Abschnitts geändert
werden.
Am Ende speichern und schliessen wir den Editor.
MGE XE Konfiguration im ModOrganizer2 [Start] [Inhaltsverzeichnis]
Als nächstes richten wir uns „MGE XE“ im ModOrganizer ein.
Rechts im ModOrganizer gibt es die Schaltfläche >Run. Links von dieser Schaltfläche
gibt es ein DropDown-Menu (pull down menu).

Falls bei euch in diesem Menu noch nicht „MGE XE“ anzutreffen ist, geht ihr auf
<Edit...> und fügt die MGEXEgui.exe aus dem Morrowind-Verzeichnis hinzu.
„Add from file“ drücken und Pfad heraus suchen. Einstellungen wie im Bildschirmfoto
setzen.

„Apply“ auswählen und „OK“ drücken. Jetzt ist MGE XE im DropDown-Menu enthalten und
kann von uns gestartet werden.
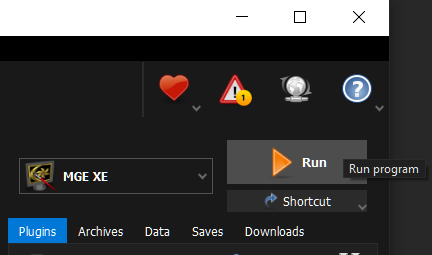
Wir starten jetzt MGE XE, indem wir MGE XE
im drop down menu auswählen und auf Run drücken.
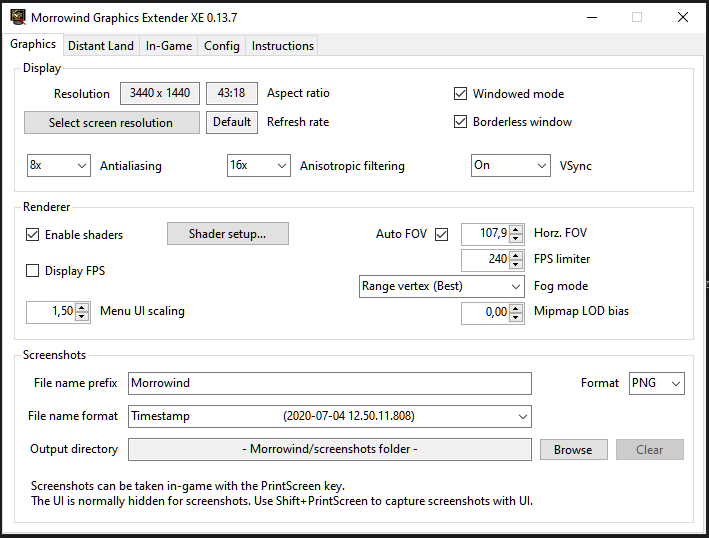
Stellt euch eure eigene Bildschirmauflösung unter Resolution ein.
„Enable Shaders“ aktivieren und folgendes im „Shader Setup“ einstellen:
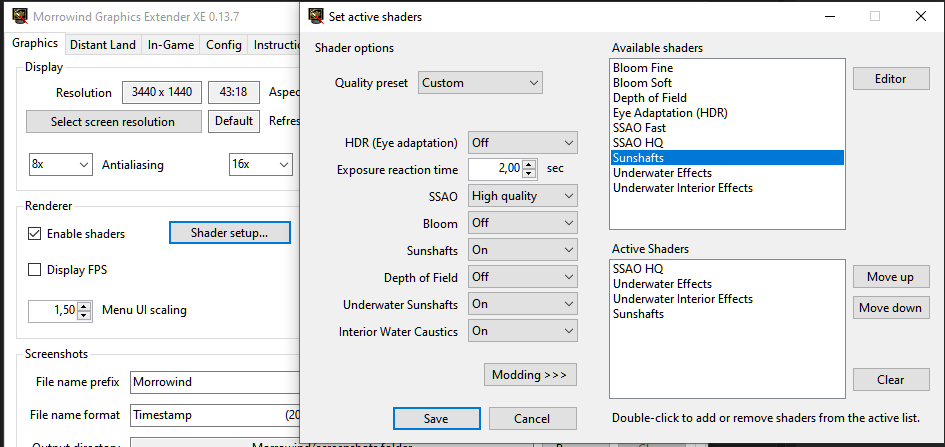
und auf „Save“ drücken.
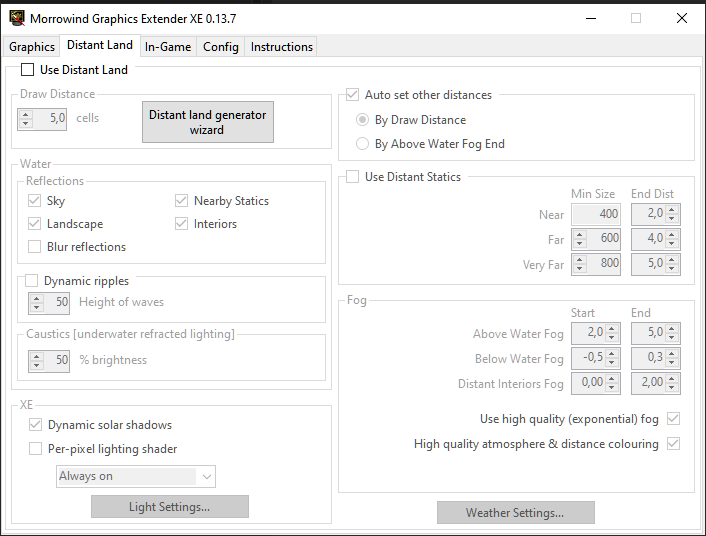
Wir erzeugen jetzt das erste Mal „Distant Land“ im zweiten Reiter,
indem wir auf die Schaltfläche „Distant land generator wizard“ drücken.
Da wir derzeit noch keine Gräser und Bodentexturen (grasses and groundcovers)
installiert haben, drücken wir jetzt erst mal auf „Select all“, damit alle Plugins
aktiviert sind.
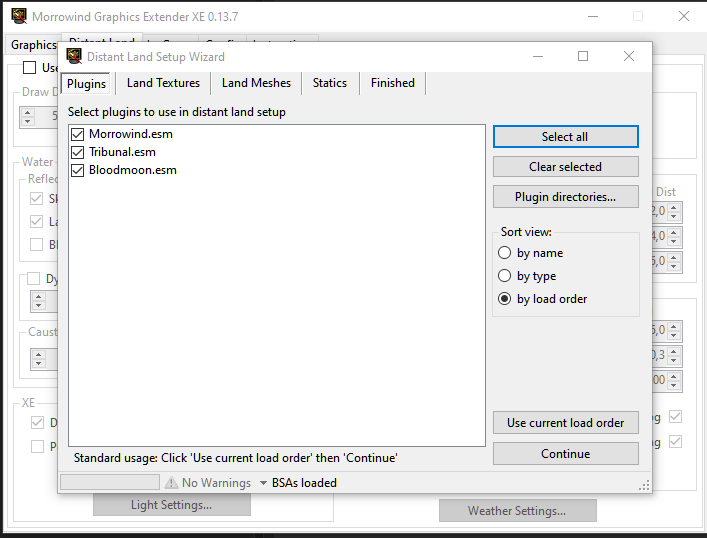
Und jetzt drücken wir auf „Continue“.
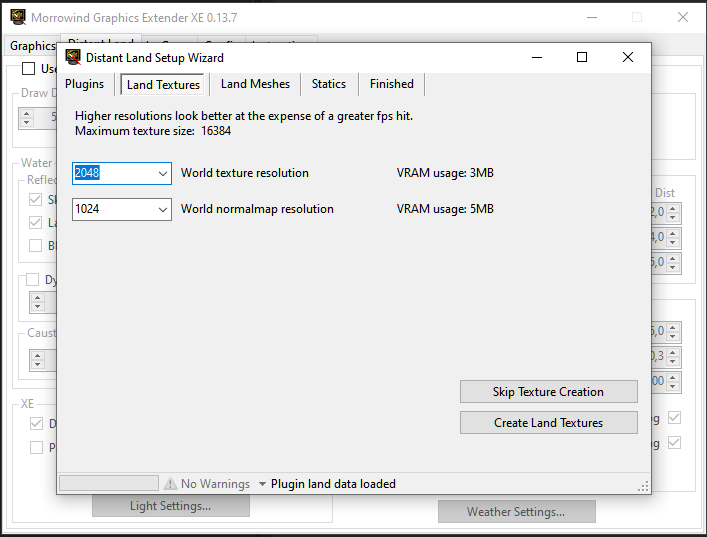
Im nächsten Fenster belassen wir alles so, wie es ist und klicken auf
„Create Land Textures“.
Die Land Meshes stelle ich auf Ultra High. Wir sind ja nicht mehr im PC-Mittelalter.
Und drücken auf „Create Land Meshes“.

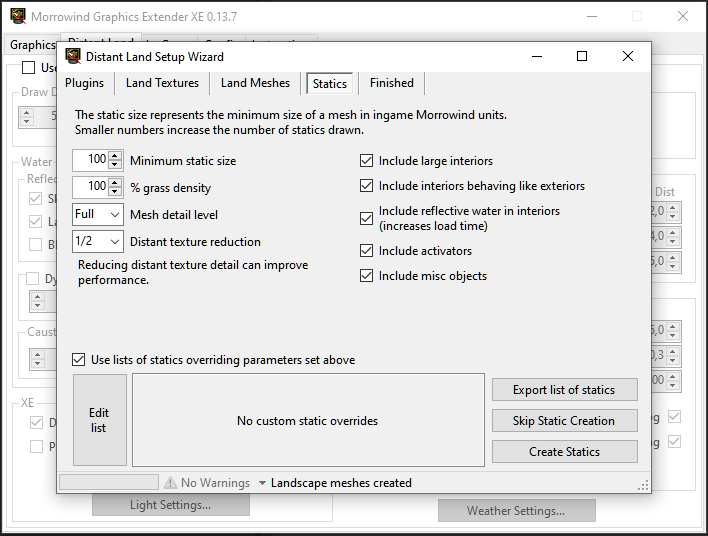
Bei den statischen Objekten (statics) nehme ich die folgenden Einstellungen vor:
Wir klicken jetzt auf „Edit list“ und fügen mit „Add“ die Datei 00_main.ovr aus dem
Unterverzeichnis mge3 hinzu, welche wir über unsere Mod vorhin zusammen mit den dazu
gehörenden Dateien in dieses Verzeichnis extrahiert haben.
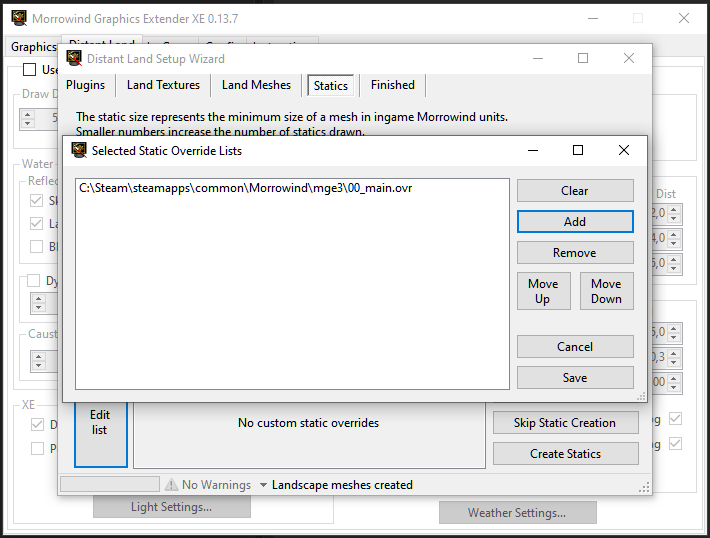
Nach dem Speichern (save) haben wir die folgende Ansicht:
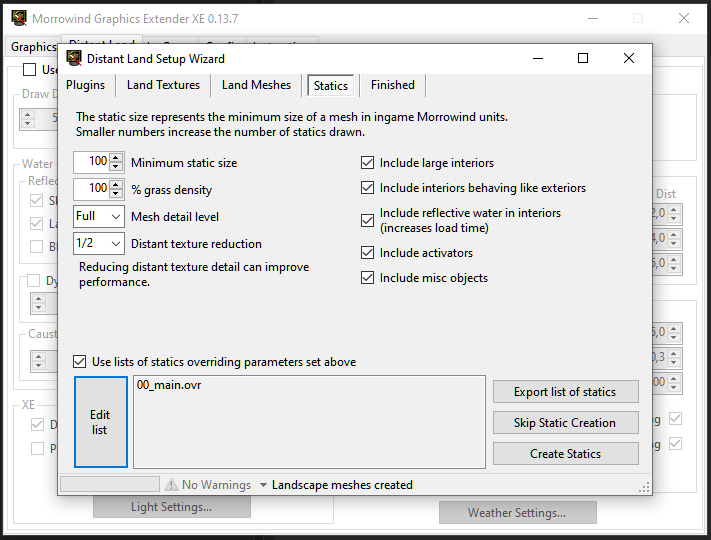
Jetzt gehen wir auf „Create Statics“ und warten, bis alles generiert wurde. Danach
beenden wir mit „Finish“.
Jetzt sind alle Optionen im Reiter „Distant Land“ verfügbar.
Wir deaktivieren „Auto set other distances“ und stellen folgendes ein:
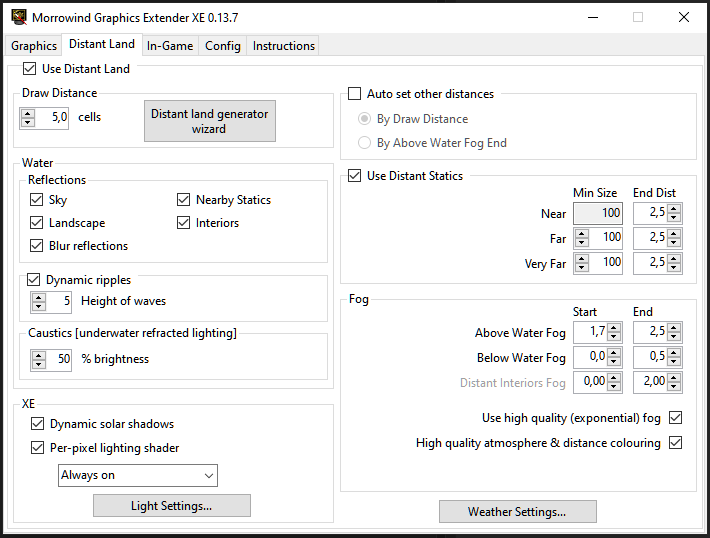
Meine in-Game Einstellungen:
Resolution trouble-shooting: no more full screen
Nachdem ich beim Playtesting mit dem UHD-Monitor (4k2k, 3840 x 2160 native)
in der in-Game Einstellung "Video" und im MGE XE die Bildschirmauflösung
mehrmals auf "2560 x 1440" angepasst habe, startete das Spiel auf einmal
nicht mehr im Vollbild-Modus.
Da es keine check-box für den Vollbildmodus gibt, wusste ich mir zuerst nicht
weiter zu helfen. Genauer gesagt: Wenn ich im windowed-mode startete,
dann sah ich weiterhin Windows-Anwendungen und den Desktop;
und wenn ich nicht im windowed-mode startete, dann hatte ich an allen vier
Seiten einen schwarzen Balken in der Darstellung.
Da ich zuerst an ein selbst verursachtes Problem oder ein Software-Problem
dachte, hatte ich im Internet nach einer Lösung gesucht.
Nach etwas Recherche im Internet bin ich auf den folgenden
Tip
gestoßen:
1. regedit aufrufen mit Win+R, In die Suche regedit
eingeben und ENTER drücken.
2. den folgenden Pfad aufsuchen:
Computer\HKEY_LOCAL_MACHINE\SOFTWARE\WOW6432Node\Bethesda Softworks\Morrowind
3. Die beiden Werte "Screen Height" und "Screen Width"
suchen und auf die aktuelle Bildschirmauflösung eures Systems einstellen.
Ich habe diese Lösung nur behalten, für den Fall, dass diese anderen hilft. Bei
mir war das Problem allerdings der Monitor SAMSUNG (55" QLED 4K TV Q67A (2021)).
Wenn ich über das NVIDIA Control Panel die Auflösung ändere, dann wird kein
Vollbild auf dem Fernseher erzeugt. Wenn ich in den Windows-Einstellungen
die Auflösung ändere, dann erhalte ich zwar ein ge'stretch'tes Bild, welches
aber sehr unscharf ist. Also muss ich auf dem UHD-Fernseher auf diese Auflösung
verzichten.
trouble-shooting: Flackerndes Bild
Das ursprüngliche Problem ist folgendes gewesen: Das Bild fing im
Spiel an zu flackern.
Das fand allerdings nur im windowed-mode statt. Deswegen wollte
ich von der UHD Auflösung herunter. Denn ich dachte zuerst, dass ich vielleicht
meine Grafikkarte überlasten würde. Nachdem ich allerdings nun den
windowed-mode deaktivert habe, lässt sich Morrowind in 3840 x 2160 erleben.
Wichtige Modding Werkzeuge (TES3View,
TES3Merge, TESAME, Wrye Mash, tes3cmd)
[Start]
[Inhaltsverzeichnis]
TES3View [Start] [Inhaltsverzeichnis]
URL:
https://github.com/Sigourn/morrowindsharp/tree/main/mods
Datei: TES3View 4.1.4.7z
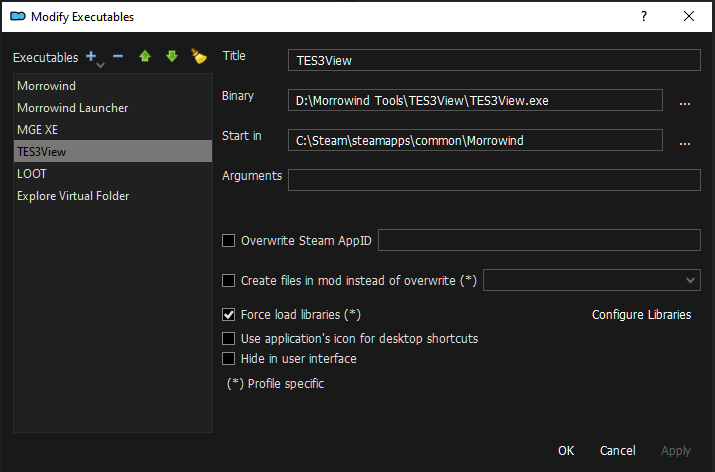
Wir extrahieren diese Dateien im Verzeichnis D:\Morrowind Tools\TES3view und fügen
TES3view.exe -genauso wie vorher „MGE XE“- im DropDown-Menu im ModOrganizer hinzu.
Im Formularfeld „Start in“ setzen wir den Pfad auf unser Morrowind-Verzeichnis
C:\Steam\steamapps\common\Morrowind.
TES3Merge [Start] [Inhaltsverzeichnis]
URL: TES3Merge
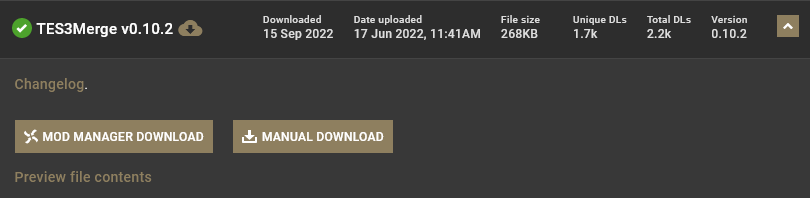
Data:
https://www.nexusmods.com/morrowind/mods/46870?tab=files
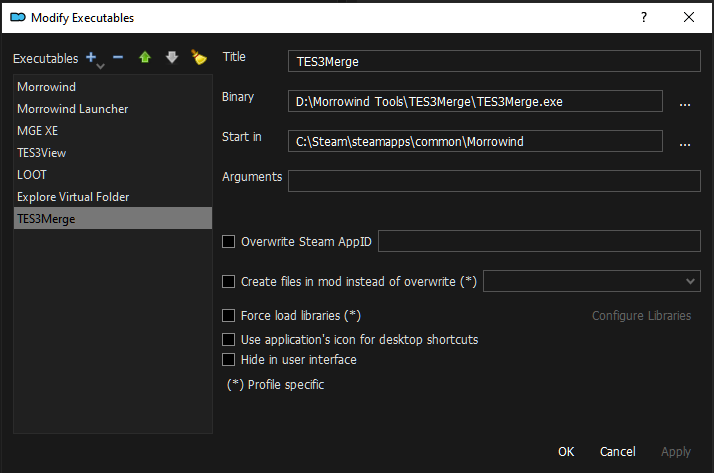
Wir extrahieren diese Dateien im Verzeichnisse D:\Morrowind Tools\TES3Merge und fügen
TES3Merge.exe genauso wie vorher „MGE XE“ im DropDown-Menu im ModOrganizer hinzu.
Im Formularfeld „Start in“ setzen wir den Pfad auf unser Morrowind-Verzeichnis
C:\Steam\steamapps\common\Morrowind.
Für Tes3Merge wird „Microsoft .NET 6.0 Desktop Runtime“ benötigt! Also bitte jetzt
herunterladen und installieren..
Homepage:
https://dotnet.microsoft.com/en-us/download/dotnet/6.0/runtime
Download (direct link):
https://dotnet.microsoft.com/en-us/download/dotnet/thank-you/runtime-desktop-6.0.9-windows-x64-installer
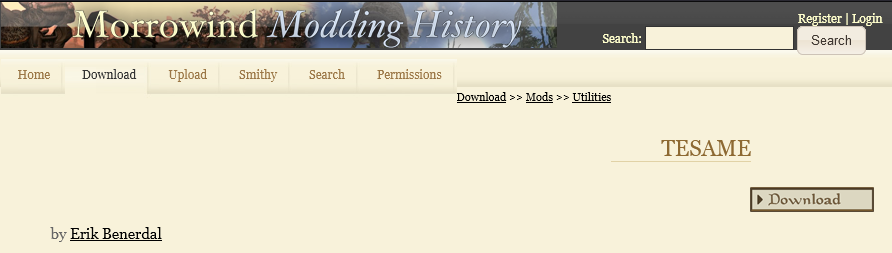
TESAME [Start] [Inhaltsverzeichnis]
URL:
https://mw.modhistory.com/download-95-15443
(modhistory.com ist DOWN)
URL: https://web.archive.org/web/20161103115457/http://mw.modhistory.com/download-95-15443
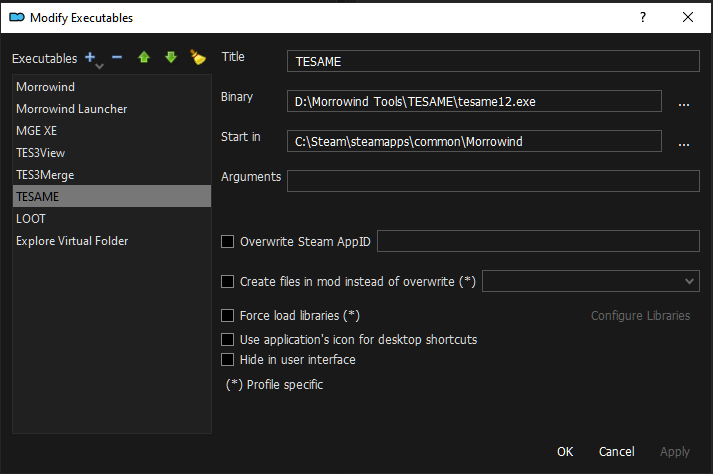
Wir extrahieren diese Dateien im Verzeichnis D:\Morrowind Tools\TESAME
und fügen tesame12.exe genauso wie vorher „MGE XE“ im DropDown-Menu
im ModOrganizer hinzu.
Wrye Mash [Start] [Inhaltsverzeichnis]
URL:
Wrye Mash - Polemos fork - 2021
Wrye Mash ist für sich selbst gesehen eigentlich auch ein mächtiger Mod Manager.
Wenn ich den Mod Organizer 2 nicht kennen würde, wäre Wrye Mash der nächste Mod
Manager, den ich all den neueren unkomfortablen Mod Managern vorziehen würde,
weil Wrye Mash sehr viel unter der Haube hat.
Wir nutzen ihn aber nur als Werkzeug innerhalb von MO2, um beispielsweise Mods
oder Speicherstände zu reparieren.
Bei den anderen Tools war es egal, wo wir diese installieren. Bei Wrye Mash müssen
wir den klassischen Weg einschlagen und die Installation im Morrowind Verzeichnis
ausführen. Da ich diesem Werkzeug vertraue, mache ich kein weiteres Backup. Wer
Backups liebt, kann gerne vor dieser Installation ein weiteres Mal das
Morrowind-Verzeichnis kopieren und dieser Kopie einen geeigneten Namen geben wie:
Morrowind.MCPatched.MGExe.MWSEbeta
Wir müssen zwei Pakete von der Seite installieren:
Data:
https://www.nexusmods.com/morrowind/mods/45439?tab=files
a) Wrye Mash 2019 x64 - Installer (Main files)
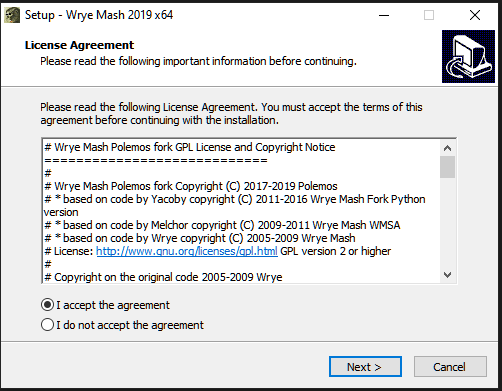
Wir starten den Installer
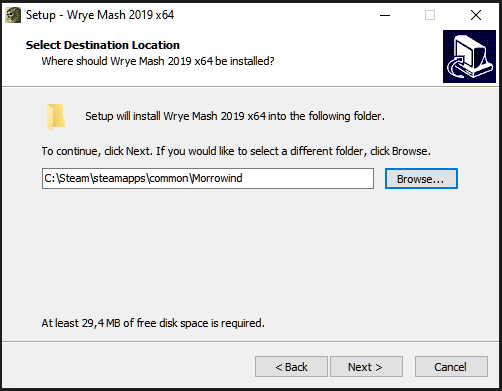
Für die Installation wählen wir das Morrowind-Verzeichnis
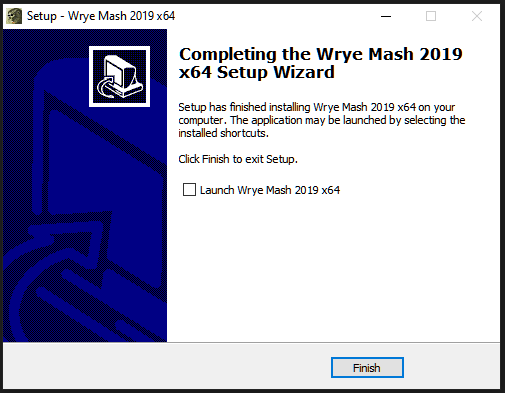
Am Ende deaktivieren wir die Checkbox, weil Wrye Mash noch nicht gestartet werden
soll.
b) Wrye Mash 2019 - x64 - manual installation archive.
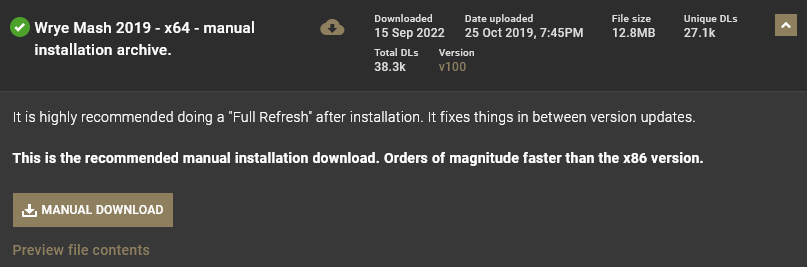
Wir entpacken den Inhalt im Morrowind-Verzeichnis.
Wenn wir gefragt werden, erlauben wir das Überschreiben existierender Dateien.
Ich installiere außerdem von den Update Files...

Nun gehen wir in das Morrowind-Verzeichnis und darin in das Unterverzeichnis Mopy,
welches von Wrye Mash angelegt wurde. Da es sich um einen sehr mächtigen Mod
Manager handelt, finden wir hier sehr viele Unterordner und Dateien.
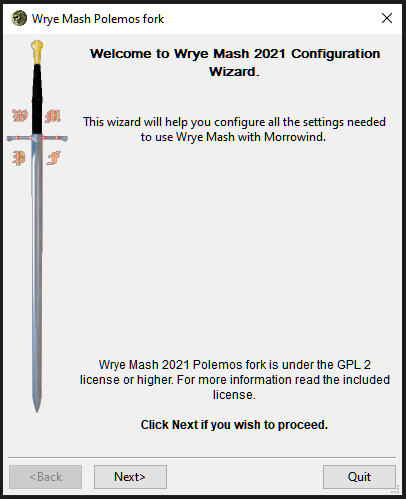
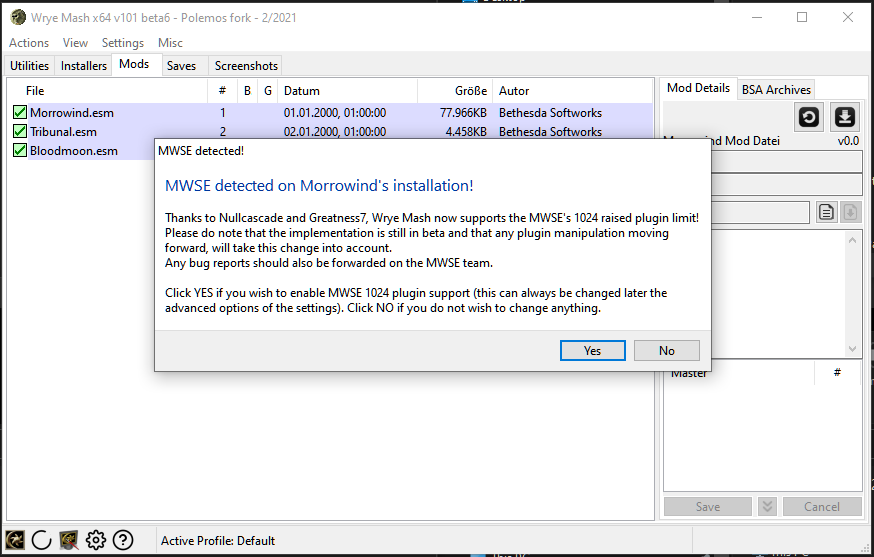
Wir starten jetzt Wrye Mash direkt über die mash64.exe.
Hier werde ich jetzt alle Ansichten ablichten, weil es verwirrend sein könnte.
Hier solltet Ihr genau das machen, was ich ‚sage‘. Ich hoffe, das geht ausnahmsweise
mal klar.
Das Mods Installers directory
in der folgenden Abbildung ist egal, weil wir
WryeMash nicht als ModManager nutzen werden. Ansonsten würden wir hier den Ort
stehen haben, an welchen wir unsere Mods platzieren wollen.
Mlox wird zum Sortieren der Ladereihenfolge von Plugins genutzt. Da ihr meiner
Anleitung folgt, werden wir Mlox nicht benutzen.

Falls Ihr irgendwann einmal russische Mods installieren solltet,
die nicht nur meshes und textures enthalten, und darin kyrillische
Schriftzeichen verwendet werden sollten, dann wäre es besser, Encoding settings
auf utf-8 (experimental zu setzen).
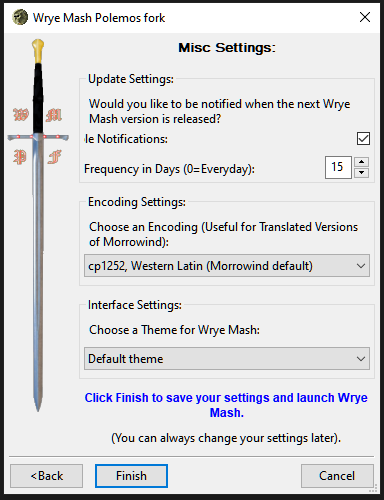
Ihr drückt an dieser Stelle unbedingt auf „Yes“ !!!
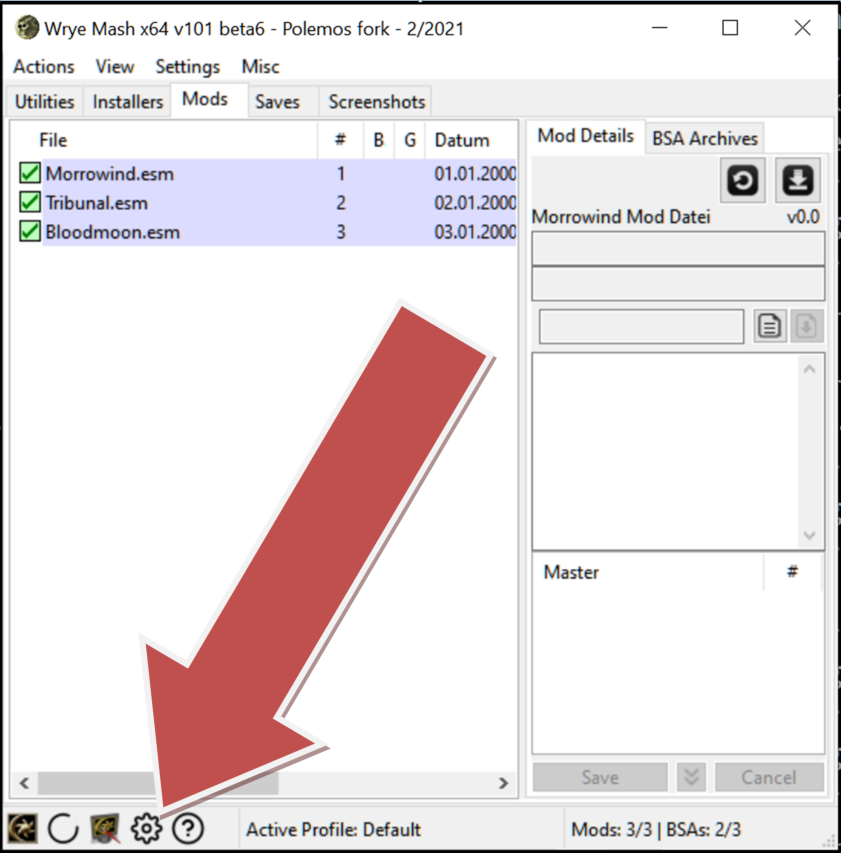
Falls ihr irgendwann einmal diese Einstellungen ändern wollt, dann schaut links unten
nach dem Zahnrad-Symbol.
Wrye Mash ist jetzt eingerichtet und kann an dieser Stelle erst einmal geschlossen
werden. Wir benutzen tes3cmd innerhalb von Wrye Mash. Daher installieren wir
tes3cmd als nächstes.
tes3cmd [Start] [Inhaltsverzeichnis]
URL:
https://github.com/john-moonsugar/tes3cmd/releases/
Wir entfalten den Bereich unterhalb von Assets und laden tes3cmd.exe
herunter:


Wir kopieren die Datei in das Unterverzeichnis „Data Files“ unterhalb unseres
Morrowind-Ordners. tes3cmd.exe liegt direkt bei den .esm Dateien.

Dies machen wir im Grunde nur für Wrye Mash.
tes3cmd.exe könnte auf der Kommandozeile auch von woanders aus
genutzt werden. Dies lassen wir in dieser Anleitung allerdings aus. Wenn Ihr im
Laufe der Zeit neugieriger seid, könnt ihr euch auch mit diesen Werkzeugen genauer
beschäftigen und dann werdet ihr euren eigenen Weg finden, wie ihr lieber arbeiten
wollt.
Ich zeige euch einen Weg, bei dem ihr die Werkzeuge nur dann starten müsst, wenn
ich es euch sage. Dadurch bekommt ihr ein Gefühl dafür, wie man beim Modden arbeitet.
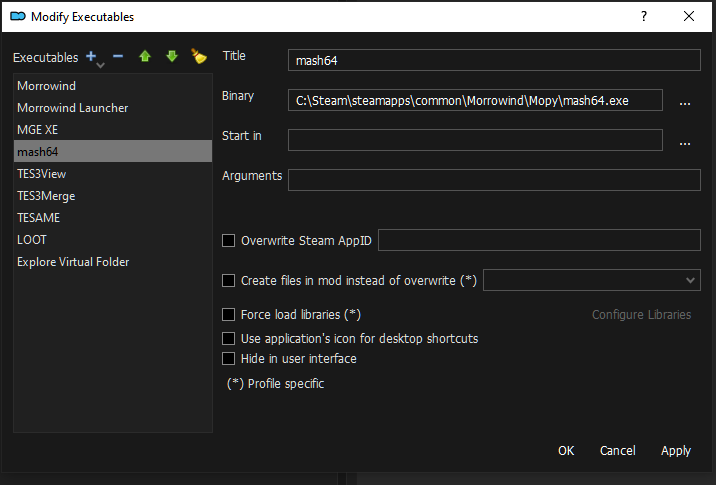
Zum Abschluss wollen wir jetzt noch Wrye Mash in den „Mod Organizer 2“ integrieren.
Entweder wie bisher auf

Dann mit „Add from file…“ die ausfürhbare Datei mash64.exe
heraussuchen, die wir
unter C:\Steam\steamapps\common\Morrowind\Mopy
installiert haben und auf OK drücken.
trouble-shooting:
Falls sich Wrye Mash nicht mehr
über den ModOrganizer2 aufrufen
lässt, die Anwendung selbst aber
beim direkten anklicken im Mopy
Verzeichnis funktioniert, dann
muss der Link im MO2 einfach nur
gelöscht und neu erstellt werden.
Mir passiert das gelegentlich mal,
weil ich das Morrowind-Verzeichnis
unter Steam verschiebe oder lösche.
Mods (Modifikationen) installieren
(Teil 1 - Basis)
[Start]
[Inhaltsverzeichnis]
PATCHES [Start] [Inhaltsverzeichnis]
Bug Fixes [Start] [Inhaltsverzeichnis]
Patch for Purists is an unofficial patch for The Elder Scrolls III: Morrowind Game of the Year Edition that takes a more conservative approach about what it considers a "bug."
Data: https://www.nexusmods.com/morrowind/mods/45096?tab=files
An attempt to fix the many issues present in Bethesda's original Official Plugins. Includes fixes for all of the Official Plugins, and offers merged and compatibility options as well.
Main File „UMOPP 3.2.0“
Data: https://www.nexusmods.com/morrowind/mods/43931?tab=files
This is a re-upload of Particle Arrow Replacer by Ghostnull, since it is not available anywhere. The plugin adds unique particle effects to all enchanted arrows in Morrowind, Tribunal, and Bloodmoon.
Data: https://www.nexusmods.com/morrowind/mods/47749?tab=files
An alternative version of the official plugin Area Effect Arrows that distributes the new projectiles throughout the game world rather than dumping them all in one shop. Also includes an integrated version of BTB's Area Effect Projectiles.
Data: https://www.nexusmods.com/morrowind/mods/47745?tab=files
Deaktiviert alle Plugins bis auf Area Effect Arrows Integrated.ESP.
Places one copy of each adamantium armor piece (except the helm) in Vvardenfell. They're not for sale.
Data: https://www.nexusmods.com/morrowind/mods/47731?tab=files
Main File „Better Propylon Teleport Script“
Scripts now work as intended!
Data: https://www.nexusmods.com/morrowind/mods/46364?tab=files
Deaktiviert alle Plugins bis auf „Better Propylon Teleport Warp-Master Index.ESP“
The Publicans fixes several places in the vanilla game that were set up like inns, but Bethesda has forgotten to add the option to rent a room.
Data: https://www.nexusmods.com/morrowind/mods/45410?tab=files
Edits, re-filters, or adds on to vanilla dialogue to add more situational nuance - tavern owners will no longer talk about themselves in third person, Ashlanders will no longer curse vampires in the name of Almsivi, slave owners won't talk lovingly about abolitionists, and thieves will be less blase about incriminating themselves to strangers.
Data: https://www.nexusmods.com/morrowind/mods/48273?tab=files
Ich bin mir bei den FMI-mods nicht sicher. Im Allgemeinen bedeutet FMI For More Information.
Not all Dunmer are slavers. Not all Argonians are slaves. Idle dialogue filtering has been improved to reflect this.
Data: https://www.nexusmods.com/morrowind/mods/47569?tab=files
Allows the player to find the exact amount of Adamantium Ore needed (45) in the existing twenty Raw Adamantium rocks. This way the crafting service at Bols Indalen is sufficient, without overflowing the player with pieces of ore that is precious by lore.
Data: https://www.nexusmods.com/morrowind/mods/47068
Fixes the puzzle in the Corprusarium.
Data: https://www.nexusmods.com/morrowind/mods/45155?tab=files
Checkboxen im Installer: Main→Patch for Purists
Wir benutzen nicht den Patch für „Ownership Overhaul“, weil der Eigentümer beim Öffnen der Schatulle feindselig wird.
This mod fixes another one of Beth's oversights.
Data: https://www.nexusmods.com/morrowind/mods/46720?tab=files
Main File: Services Restored
This mod does two things. 1) Cinia Urtius (master trainer for Medium Armor) is added to the game. 2) Hecerinde now sells Secret Master variety of lockpicks and probes (like he did in the unpatched v1.0 of the game).
Data: https://www.nexusmods.com/morrowind/mods/47068?tab=files
Falls ihr nur Cinia haben wollt, dann könnt ihr statt dieser Mod folgende benutzen: Cinia
Restores previously unused Silt Strider animation.
Data: https://www.nexusmods.com/morrowind/mods/44150?tab=files
Construction materials and scaffolding are now visible at the Great House strongholds during construction of the later stages.
Data: https://www.nexusmods.com/morrowind/mods/50285?tab=files
MWSE lua mod, which prevents Fortify Health and Drain Health effects from killing actors outright, leaving them at least one health point.
Data: https://www.nexusmods.com/morrowind/mods/48971?tab=files
Carries over unique item information, such as condition and script data when enchanting items.
Data: https://www.nexusmods.com/morrowind/mods/50029?tab=files
Fixed a bug where the mod wasn't initialized early enough, which was causing Weight of the World (which depends on this mod) to sometimes not detect it.
Data: https://www.nexusmods.com/morrowind/mods/51161?tab=files
Causes Fortify Magicka and Fortify Fatigue to affect the maximum as well as the current stat.
Removed code that was also in CCCP, and put it in a separate mod. That mod, Attribute Effect Tweaks, is now required.
Data: https://www.nexusmods.com/morrowind/mods/49825?tab=files
This mod effectively normalizes the player's movement speed, ensuring they run at a consistent speed even during diagonal movement.
Data: https://www.nexusmods.com/morrowind/mods/45947?tab=files
Dropped items and corpses are automatically positioned and oriented to align with the ground.
Data: https://www.nexusmods.com/morrowind/mods/49557?tab=files
Automatically synchronizes linked doors locked/unlocked state on activate, lock/unlock by spell, unlock by lockpick, key.
Should work great with mods like pursuit enhanced allowing NPCs to chase you through doors and give purpose to the lock spell.
Makes loading doors play close sound a short time after opening.
Requires MWSE-Lua
Data: https://www.nexusmods.com/morrowind/mods/46094?tab=files
Makes the Willpower stat less fucking useless by fixing the spell resist mechanics.
Requires MWSE 2.1-dev.
Data: https://www.nexusmods.com/morrowind/mods/45742
Die Mod benötigt, die „MWSE in-dev version“
This mod makes the game treat skill increases from quests as if there were raised via normal means.
Data: https://www.nexusmods.com/morrowind/mods/48269?tab=files
This mod fixes a bug where GMST values are not applied properly when raising a skill via NPC training or a skill book.
Data: https://www.nexusmods.com/morrowind/mods/48029?tab=files
Using MWSE, this mod corrects an oversight which causes thrown projectiles to inflict twice their listed damage.
Data: https://www.nexusmods.com/morrowind/mods/49609?tab=files
This mod is for people who seem to have issues crashing or losing mouse control on exit. By hijacking the exit buttons, this mod will force the game to exit.
Data: https://www.nexusmods.com/morrowind/mods/45634?tab=files
This simple mod provides an in-game HUD element as the game approaches critical memory limits.
Data: https://www.nexusmods.com/morrowind/mods/45696?tab=files
This simple mod provides an in-game HUD element as the game approaches critical memory limits.
Data: https://www.nexusmods.com/morrowind/mods/45608?tab=files
Mesh Fixes [Start] [Inhaltsverzeichnis]
As textures became more and more detailed, seams became more noticable . These seams are a result of the UV mapping of the texture onto the meshes.
Data: https://mw.modhistory.com/download-56-12003
Restores visual effects on creatures.
Data: https://www.nexusmods.com/morrowind/mods/46194?tab=files
Sick of getting caught on those bastard degenerate rope fences? No more!
This also includes a file that reduces player and NPC hitboxes, which makes it easier to squeeze past NPCs in tight situations, such as inside the Ald Skar, where many of those bastard rope fences reside.
Data: https://www.nexusmods.com/morrowind/mods/45741?tab=files
Makes thrown weapon projectiles fly pointy end forward and, some of them, spin in the air.
Data: https://www.nexusmods.com/morrowind/mods/44763?tab=files

Mit der rechten Maustaste auf „Data Files“ drücken und „Set as <data files> directory“ aktivieren. Danach auf OK drücken.
Greatly improves performance and fixes tons of mesh errors.
Data: https://www.nexusmods.com/morrowind/mods/45384?tab=files
The goal of Project Atlas is to identify the most performance heavy areas of vanilla Morrowind and some popular mods and target high usage/strain meshes in those areas for atlasing. This effort involves reworking the UVs for those meshes and creating texture atlases to cover various sets.
Data: https://www.nexusmods.com/morrowind/mods/45399?tab=files
Main File: Project Atlas
Main Fdile: Textures – MET
Update Files: Hotfix 0.7.2
Achtung: In der aktuellen Version fehlt die Datei
atlas_velothi.dds,
welche für die Mod Glass Domes of Vivec - Performance-friendly Open-ish Cantons benötigt
wird. Ich habe die texture-Datei aus „Project Atlas 0.7.0“ von den „inteligent textures“
genommen und als eigene Mod gepackt.
A pluginless mesh replacer for the scamp creature which attempts to fix the UV mapping (distortion, seams, symmetry, random mistakes, and -for some reason- the teeth being mapped onto the lips). Also included are vanilla-esque versions of EJ-12's scamp textures, but any other textures based on the vanilla mapping should be improved as well.
Data: https://www.nexusmods.com/morrowind/mods/48008?tab=files
Der Ordner „Textures“ wird von uns versteckt oder gelöscht.
A fixed Mudcrab mesh, reducing distortion and other UV errors.
Data: https://www.nexusmods.com/morrowind/mods/42130?tab=files
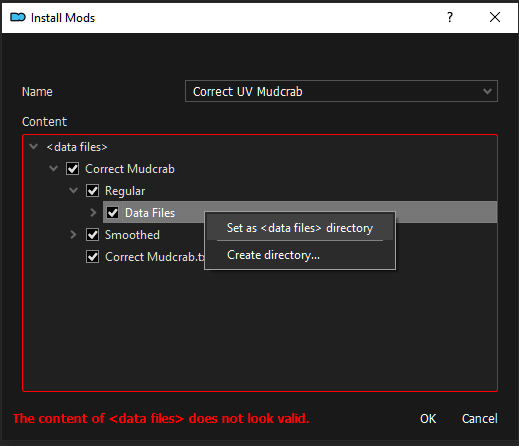 Mit der rechten Maustaste drücken wir auf das Unterverzeichnis „Data Files“ und drücken
dann auf „Set as <data files> directory“. Danach drücken wir auf OK.
Mit der rechten Maustaste drücken wir auf das Unterverzeichnis „Data Files“ und drücken
dann auf „Set as <data files> directory“. Danach drücken wir auf OK.
Flames are now glow mapped and/or properly illuminated.
Data: https://www.nexusmods.com/morrowind/mods/46124?tab=files
Wir verstecken das Plugin „Glowing Flames - TrueLightsAndDarkness Tweaks.ESP“
USER INTERFACES [Start] [Inhaltsverzeichnis]
Allgemein [Start] [Inhaltsverzeichnis]
Easy on the eyes leisure reading finally arrived! This font doesn't strain your eyes, has no known issues, no bugs. A beauty to look at. Books read lighting fast with this one!
Texture edit of Hrnchamd's Better Dialogue Font, completely reworking the Morrowind vanilla letters.
Data: https://www.nexusmods.com/morrowind/mods/49201?tab=files
A high resolution replacement for the Daedric font used in scrolls.
Data: https://www.nexusmods.com/morrowind/mods/44540?tab=files
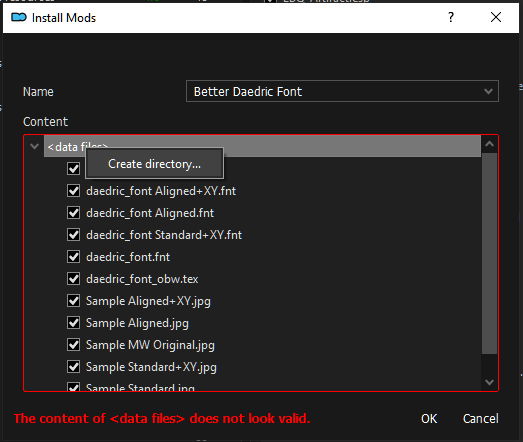
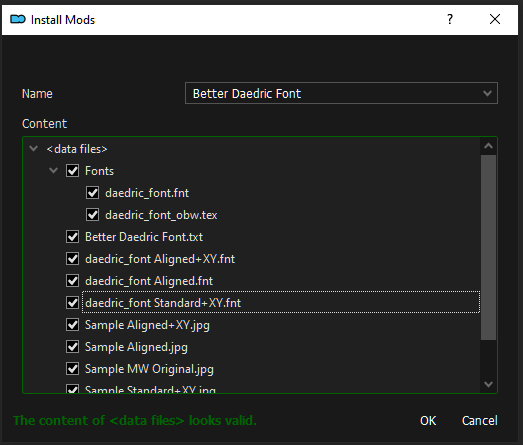
Mit der rechten Maustaste auf <data files> drücken und mittels „Create directory…“ einen Ordner mit dem Namen Fonts erstellen. Wir verschieben die beiden Dateien daedric_font.fnt und daedric_font_obw.tex in den Ordner Fonts und druecken auf OK.
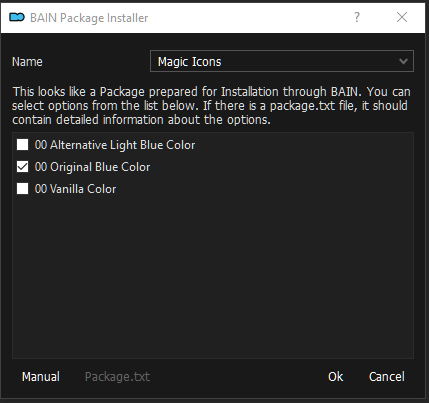
Replaces the vanilla "magic item" icon effect.
Data: https://www.nexusmods.com/morrowind/mods/50223?tab=files
Replaces most of original book arts with hi-res images redrawn from scratch by Alfred “Hieronymus7Z” Khamidullin.
Data: https://www.nexusmods.com/morrowind/mods/48896?tab=files
Mit der rechten Maustaste drücken wir auf das Verzeichnis „Data Files“ und drücken dann auf „Set as <data files> directory“. Danach drücken wir auf OK.
Data: https://github.com/Sigourn/morrowind-sharprepository/blob/main/Comrade%20Raven's%20Book%20Arts%20ESP%20Replacer.7z
1k, 2k, and 4k replacements for the scroll texture, with optional daedric alphabet.
Data: https://www.nexusmods.com/morrowind/mods/47863?tab=files
Optional File: Pete's Journal and Scroll
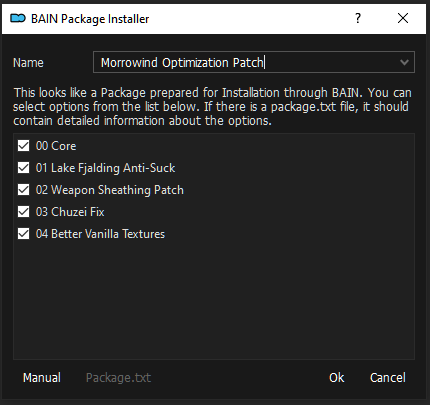
BAIN Package Installer Option: 01 Journal and Scroll - 2K
HD Title Screen and Logo Video.
Data: https://www.nexusmods.com/morrowind/mods/43657?tab=files
Da wir „skip opening movie“ im Reiter „In-Game“ von „MGE XE“ gesetzt haben, brauchen wir das alberne Logo-Video nicht.
Main File: Title Screen Reworked (Widescreen).
Adds 6 HD Morrowind GOTY map splash screens and main menu.
Data: https://www.nexusmods.com/morrowind/mods/49245?tab=files
Menus [Start] [Inhaltsverzeichnis]
Data: https://www.nexusmods.com/morrowind/mods/46851?tab=files
Data: https://www.nexusmods.com/morrowind/mods/47527?tab=files
Data: https://www.nexusmods.com/morrowind/mods/46136?tab=files
Data: https://www.nexusmods.com/morrowind/mods/48267?tab=files
Data: https://www.nexusmods.com/morrowind/mods/47962?tab=files
Data: https://www.nexusmods.com/morrowind/mods/48275?tab=files
Data: https://www.nexusmods.com/morrowind/mods/47492?tab=files
Wir verstecken den Textures-Ordner: Wir Doppelklicken auf die Mod und mit der rechten Maustaste auf den Ordner.

Data: https://www.nexusmods.com/morrowind/mods/49912
Data: https://www.nexusmods.com/morrowind/mods/47954?tab=files
Main File: Consistent Keys - MWSE Version
Data: https://www.nexusmods.com/morrowind/mods/49941?tab=files
Data: https://www.nexusmods.com/morrowind/mods/49861?tab=files
Hotkeys [Start] [Inhaltsverzeichnis]
Data: https://www.nexusmods.com/morrowind/mods/48929?tab=files
Data: https://www.nexusmods.com/morrowind/mods/46625?tab=files
Data: https://www.nexusmods.com/morrowind/mods/50716?tab=files
Adds a cancel button to Temple shrines and Imperial Cult altars.Data: https://www.nexusmods.com/morrowind/mods/49681?tab=files
Drastically speed up time while a key is pressed, a more natural way to wait than the vanilla wait menu. Also configure the normal timescale.Data: https://www.nexusmods.com/morrowind/mods/48217?tab=files
GAMEPLAY [Start] [Inhaltsverzeichnis]
Gameplay QOL [Start] [Inhaltsverzeichnis]
Data: https://www.nexusmods.com/morrowind/mods/46428
„EasyMCM has now been merged into MWSE 2.1, so downloading is no longer necessary.“
Data: https://www.nexusmods.com/morrowind/mods/46599?tab=files
Data: https://www.nexusmods.com/morrowind/mods/49154?tab=files
Data: https://www.nexusmods.com/morrowind/mods/47864?tab=files
Data: https://www.nexusmods.com/morrowind/mods/49373?tab=files
Data: https://www.nexusmods.com/morrowind/mods/47706?tab=files
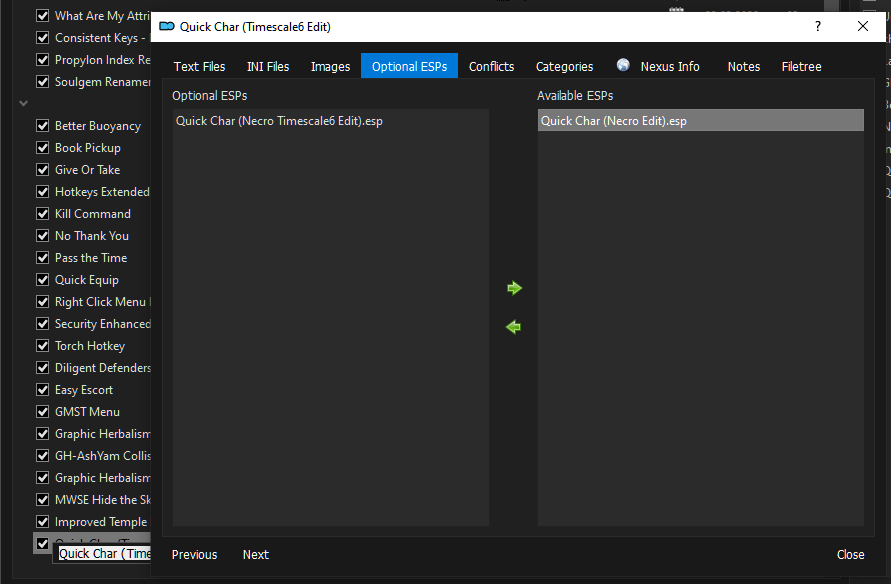
Wir verstecken „Quick Char (Necro Timescale6 Edit).esp“
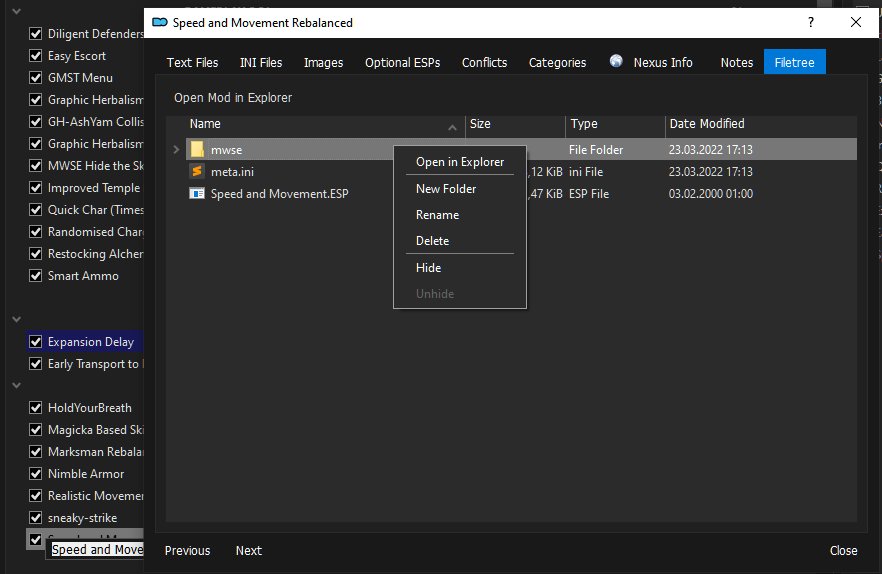
Mit Doppelklick auf die Mod gehen. In der Kartei „Optional ESPs“ das besagte Plugin von rechts nach links verschieben.
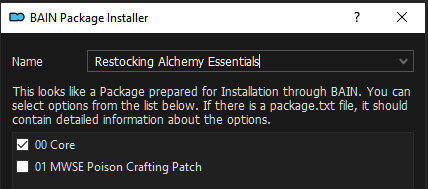
Main File: Restocking Alchemy Essentials
Data: https://www.nexusmods.com/morrowind/mods/49232?tab=files
Spielerweiterungen [Start] [Inhaltsverzeichnis]
Data: https://www.nexusmods.com/morrowind/mods/47985?tab=files
Spiel Optimierungen [Start] [Inhaltsverzeichnis]
Data: https://www.nexusmods.com/morrowind/mods/48872?tab=files
Data: https://www.nexusmods.com/morrowind/mods/48330?tab=files
Data: https://www.nexusmods.com/morrowind/mods/48251?tab=files
Data: https://www.nexusmods.com/morrowind/mods/46248?tab=files
Data: https://www.nexusmods.com/morrowind/mods/48317?tab=files
Data: https://www.nexusmods.com/morrowind/mods/46029?tab=files
Wir verstecken den mwse-Ordner („Hide“).
Data: https://www.nexusmods.com/morrowind/mods/50839?tab=files
Data: https://www.nexusmods.com/morrowind/mods/49829?tab=files
Data: https://www.nexusmods.com/morrowind/mods/48783?tab=files
Data: https://www.nexusmods.com/morrowind/mods/46626
Data: https://www.nexusmods.com/morrowind/mods/51096?tab=files
File: All Reputation Fixes
Magie-System [Start] [Inhaltsverzeichnis]
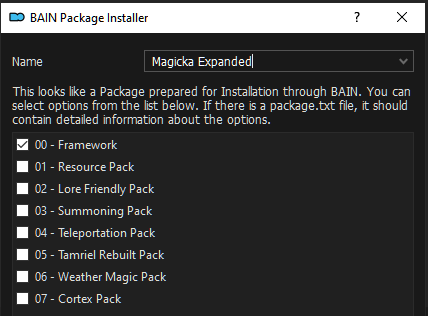
Data: https://www.nexusmods.com/morrowind/mods/47111?tab=files
Wir wollen nur das Framework fuer die Mods „Miscast Enhanced“ und „MM – Enhanced Detection“.
Data: https://www.nexusmods.com/morrowind/mods/47948?tab=files
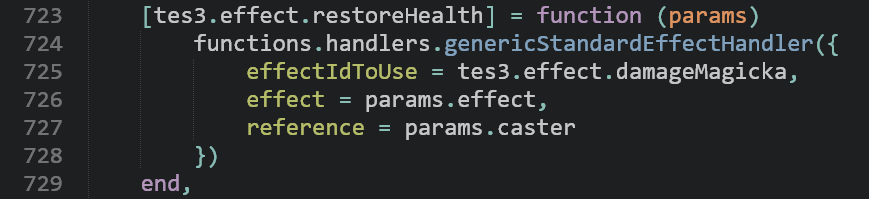
Innerhalb dieser Mod „Miscast Enhanced“ öffnen wir jetzt „MWSE\mods\OperatorJack\MiscastEnhanced\effects.lua“ mit einem Texteditor und ersetzen in Zeile 725 den Eintrag „tes3.effect.damageHealth“ durch den Eintrag „tes3.effect.damageMagicka“. Wenn also jemand nicht richtig mit den Zaubersprüchen umgehen kann, verliert er nicht „Gesundheit“ sondern „Mana/Magicka/Astralenergie“.
Vorher:
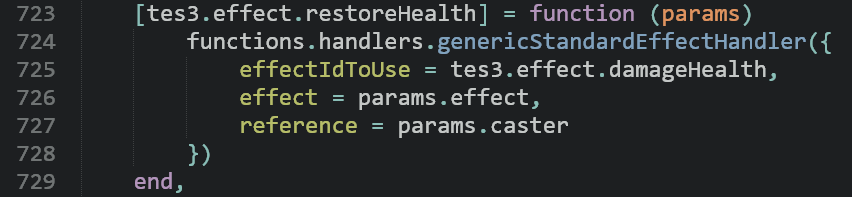
Nachher:
Data: https://www.nexusmods.com/morrowind/mods/47565?tab=files
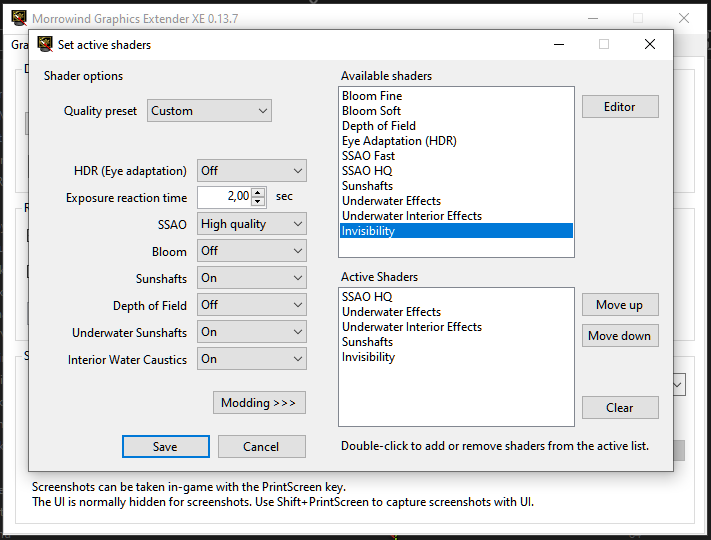
Wir fügen jetzt den Shader „Invisibility“ im Shader setup von MGE XE hinzu.
Wir starten MGE XE im ModOrganizer2 oben rechts im DropDown Menu, gehen auf Shader Setup und „Modding“ und doppelklicken im oberen Fenster auf „Invisibility“. Dadurch wird der Shader Invisibility in das untere Fenster geladen. Wir beenden mit „Save“. Fertig.
Karten-System [Start] [Inhaltsverzeichnis]
Want to get lost, but NullCascade's "Get Lost" is a bit too much? This mod allows you to replace the magical vanilla map with a selection of more mundane maps, and the minimap with a compass.
Data: https://www.nexusmods.com/morrowind/mods/48455?tab=files
A small replacement pack of maps for Maps and Compass! I wanted darker, more worn maps for my Immersion Playthrough, so decided to tweak a bit the included maps in the Wagner style.
Data: https://www.nexusmods.com/morrowind/mods/48460?tab=files
Bain Installer: nur 00 Yellowed Maps
Morrowind-Dienste System [Start] [Inhaltsverzeichnis]
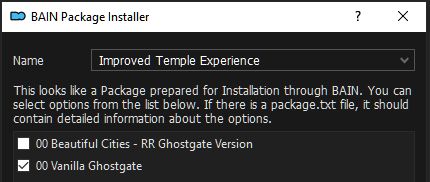
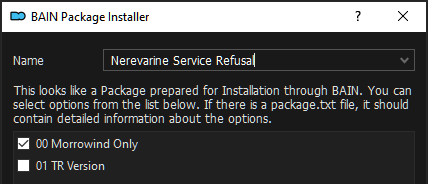
In the vanilla game, you were supposed to have to purchase "Hospitality Papers" before being able to get services in Sadrith Mora. Dialogue suggested this, and the papers were available to buy, but the mechanic of service refusal was never actually implemented.
Data: https://www.nexusmods.com/morrowind/mods/46107?tab=files
In the vanilla game, you were supposed to have to purchase "Hospitality Papers" before being able to get services in Sadrith Mora. Dialogue suggested this, and the papers were available to buy, but the mechanic of service refusal was never actually implemented.
Data: https://www.nexusmods.com/morrowind/mods/50870?tab=files
Data: https://www.nexusmods.com/morrowind/mods/49618?tab=files
Data: https://www.nexusmods.com/morrowind/mods/49232?tab=files
Main File: No Beds for the Diseased
Data: https://www.nexusmods.com/morrowind/mods/50715?tab=files
ÜBERARBEITUNGEN [Start] [Inhaltsverzeichnis]
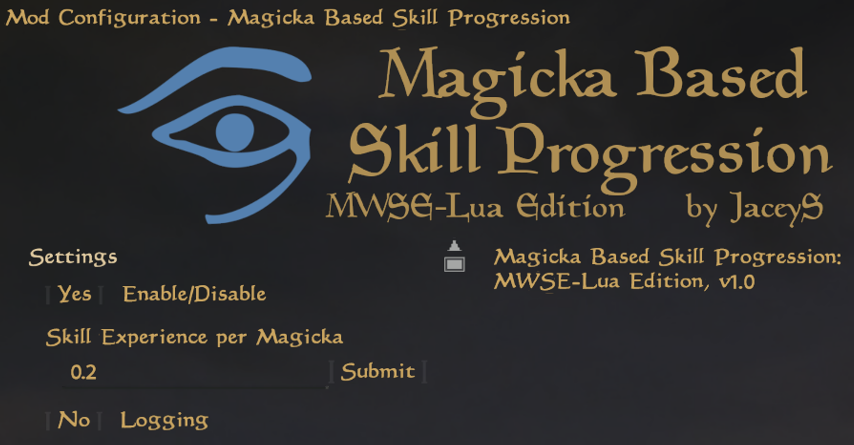
Charakter Entwicklung [Start] [Inhaltsverzeichnis]
Data: https://www.nexusmods.com/morrowind/mods/47078?tab=files
Data: https://www.nexusmods.com/morrowind/mods/48110?tab=files
Data: https://www.nexusmods.com/morrowind/mods/48989?tab=files
Spiel-System [Start] [Inhaltsverzeichnis]
Data: https://www.nexusmods.com/morrowind/mods/48528?tab=files
Data: https://www.nexusmods.com/morrowind/mods/48936?tab=files
Data: https://www.nexusmods.com/morrowind/mods/46673?tab=files
Wir verstecken „Realistic_Repair_Optional.ESP“
Data: https://www.nexusmods.com/morrowind/mods/47461?tab=files
Data: https://www.nexusmods.com/morrowind/mods/49086?tab=files
Harter Realismus [Start] [Inhaltsverzeichnis]
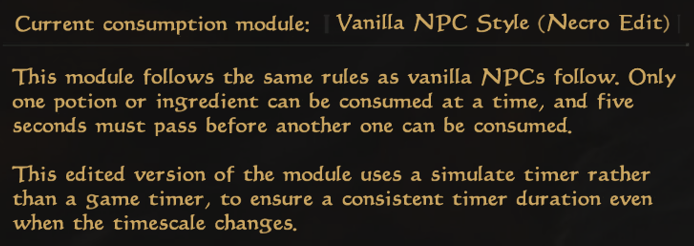
Data: https://www.nexusmods.com/morrowind/mods/49232?tab=files
Main File: Controlled Consumption (G7 - Sig- Necro Edit)
( Original Mod Controlled Consumption wird nicht benötigt )
Data: https://www.nexusmods.com/morrowind/mods/49699?tab=files
Data: https://www.nexusmods.com/morrowind/mods/49232?tab=files
Main File: Harder Barter (Sig Edit)
( Original Mod Harder Barter wird nicht benötigt )
Data: https://www.nexusmods.com/morrowind/mods/46724?tab=files
Data: https://www.nexusmods.com/morrowind/mods/48373?tab=files
Data: https://www.nexusmods.com/morrowind/mods/49232?tab=files
Main File: Morrowind Anti-Cheese (Sig Edit)
( Original Mod Morrowind Anti-Cheese wird nicht benötigt )
Informationen
Quelle: https://www.nexusmods.com/morrowind/mods/47305?tab=docsMorrowind Anti-Cheese Documentation:
1.0:
-The unguarded glass and ebony pieces at Ghostgate are now guarded by stationary armigers and ordinators
-High ranking temple members at Ghostgate, including armigers and ordinators, had their stats adjusted. They were quite the pushovers, despite their rank and being decked out in daedric and glass equipment and artifacts
-The unguarded glass, ebony and daedric equipment, as well as the mountains of gold and other valuables in the Vivec vaults are now heavily guarded
-The Sword of White Woe in the Eastern Guard Tower in Balmora has been slightly repositioned and is no longer free for the taking
-The valuable limeware platter in the Census & Excise office in Seyda Neen has been replaced with a redware platter. Due to an oversight you were able to grab everything at the beginning of the game without getting a bounty
-The complete and absolutely free Master's alchemy apparatus set in the Caldera Mages' Guild has been replaced with an Apprentice set
-Creeper and the Mudcrab merchant will still trade with you, but have significantly less gold
-Ababael Timsar-Dadisun's merchant gold has been reduced from 9000 to 1500
-Elante's and Badama Andarys' stats are higher and Ibar-Dad is significantly more dangerous now. For a place that not only contained several extremely powerful daedric items, lots of gold and valuables as well as 2 of the best shields in the game, it was insanely easy
-Most NPCs in Abanabi are more powerful, making Chrysamere slightly more difficult to obtain
-Furius Acillius is more powerful, making the Lord's Mail slightly more difficult to obtain
-The Skeleton War-Wizard in Ald Redaynia is significantly more powerful, new enemies have been added and some leveled enemies have been replaced with static high level versions, making the Vampiric Ring and Bittercup much more difficult to obtain
-Galmis Dren and most NPCs in Nammu are more powerful, making the Ring of the Wind slightly more difficult to obtain
-Vindamea Drethan is more powerful, making the Warlock's Ring slightly more difficult to obtain
-Koffutto Gilgar is more powerful, making the Staff of Hasedoki slightly more difficult to obtain
-Menta Na is more powerful and several daedra have been added to Kora-Dur, making the Mace of Molag Bal slightly more difficult to obtain
-Dreveni Hlaren and Fistelle are more powerful, making the Staff of Magnus slightly more difficult to obtain
-Sorkvild the Raven and his followers are somewhat more powerful, making the Masque of Clavicus Vile slightly more difficult to obtain
-Mastrius is slightly more powerful and no longer wears an almost full set of ebony
-Siri is more powerful and no longer wears an almost full set of ebony
-Volrina Quarra is much more powerful, making it somewhat more difficult to obtain her full set of glass armor
-King Hlaalu Helseth is immensely powerful now. Acquiring the Royal Signet Ring is extremely difficult
-Barenziah and Alusannah are more powerful, making it much more difficult to acquire her unique enchanted daedric dagger, which has an exceedingly powerful enchantment
-Tienius Delitian is much more powerful, making it much more difficult to acquire Gravedigger, possibly the best 2-handed weapon in the game
-The blind effect for the Boots of Blinding Speed has been significantly increased, making it almost impossible to circumvent it with one second spells and abilities
-The enchantment for the Blood Feast Shield is weaker. The original enchantment absorbed up to 200 points of health per use. This is incredibly overpowered for a non-unique shield
-The Shield and Resist Fire enchantments of the Ebony Mail have been reduced and its armor value has been very slightly lowered, making the Lord's Mail and Dragonbone Cuirass slightly superior in terms of pure armor rating. The Ebony Mail was one of the absolute best pieces of armor in the game with an almost outrageously good enchantment and no other cuirass even coming close to its usefulness. This evens it out a bit more
-The Reflect of Wraithguard's enchantment has been reduced
-The enchantment for Sunder and Keening has been signficantly reduced. Sunder does slightly less damage. Kagrenac's Tools, especially Sunder and Keening are woefully overpowered. Once you acquire them, the game is essentially broken. This remedies the problem somewhat, without taking away from the lore justification
-The enchantment for the Helm of Oreyn Bearclaw has been slightly reduced
-The "paralyze_en" enchantment for the Peacemaker, Silver Staff of Peace and Wooden Staff of Peace among others has been significantly reduced
-The enchantment for the Silver Staff of War has been slightly reduced. Its very high elemental damage coupled with the high weapon speed made it a very formidable weapon, despite its high availability
-The value of the Water Spear has been significantly reduced. It's a more or less generic item with bad stats and a mediocre enchantment, but for some reason had an incredibly high value
-The enchantment for the Ancient Silver Daggers in Ibar-Dad has been significantly reduced. They were very abundant and did 100 points of poison damage per strike, which is incredibly potent, despite their abundance and low value
-The enchantment for the Black Hands Dagger has been enormously reduced. Due to its effect, it had the potential to deal a minimum of 770 damage per strike, making it significantly more powerful than any other weapon in the game by a very long shot
-The Lightning Shield of Stormforge's enchantment is weaker, but lasts longer
-The enchantment for Soscean's Cuirass has been slightly reduced
-The enchantment for Elanande's Robe has been significantly reduced
-The enchantments for most Tribunal darts have been reduced to hell and back. You're welcome
-The damage of Dwarven Shock Darts has been slightly reduced, but its minimum damage has been slightly increased
-The enchantment for the Blessed Spear has been reduced
-The enchantment for King's Oath has been mildy reduced
-The Ebony Arrows of Slaying have been weakened beyond recognition. I don't think there really are any explanations in order. These arrows were so powerful that they would instantly kill anything in the game no matter how strong. They are still very powerful and can singlehandedly kill most things, but not to such a stupidly broken degree
1.1:
-The unique daedra associated with Sheogorath during Azura's quest are more powerful, making it slightly more difficult to acquire Azura's Star, arguably the most useful utility item in the game#
-Raxle Berne is more powerful, making him more befitting of his title and making it more difficult to acquire Veloth's Judgement, an exceptionally good warhammer
-Commonly Used Containers Nerfed, Container Ownership and Rarer Scrap Metal by Half11 have been incorporated into this mod
1.2:
-The original Limeware Platter in the Census Office in Seyda Neen has been replaced with a less valuable Cracked Limeware Platter instead of a Redware Platter
-The enchantments on Her Dart and Her Scimitar have been significantly reduced and no longer damage strength
-Gedna Relvel has been very severely nerfed. Her stats and spells have been adjusted and her script has been both fixed and edited to change the stat calculation. Not only does she have much lower stats now, she also doesn't scale nearly as much with player level. This all makes her a challenging, but managable boss fight instead of an utterly ridiculous joke
-Goldyn Belaram's Glass Dagger is no longer completely broken. Previously you were able to buy this broken glass dagger for a couple gold, repair it and then sell it back for thousands of gold
-The Ebony Mail's armor rating has been increased back to 100
-Ash Salts, Coda Flowers, Corprus Weepings, Daedra Hearts, Pearls, Daedra Skin, Dreugh Wax, Fire Salts, Ghoul Hearts, Heartwood, Racer Plumes, Shalk Resin and Vampire Dust are somewhat less valuable
Data: https://www.nexusmods.com/morrowind/mods/48051?tab=files
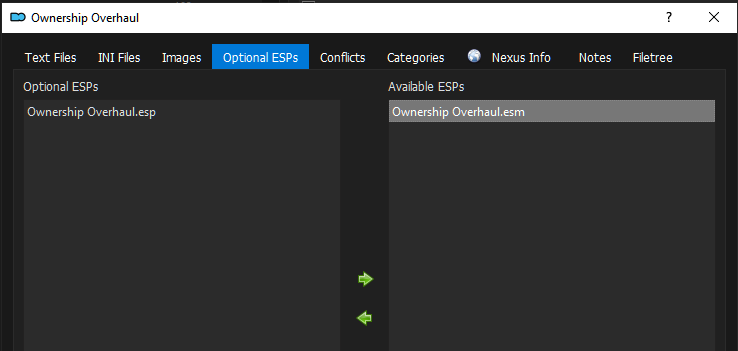
Wir verstecken die „Ownership Overhaul.ESP“
Neugewichtung der Quest-Schwierigkeit [Start] [Inhaltsverzeichnis]
Data: https://www.nexusmods.com/morrowind/mods/46036?tab=files
Data: https://www.nexusmods.com/morrowind/mods/49232?tab=files
Überleben [Start] [Inhaltsverzeichnis]
Skills Module is a framework for MWSE+Lua mods that allows you to easily create new skills in Morrowind with just a few lines of code. Leveling and UI are handled automatically, with new skills added seamlessly into the stats menu.
Data: https://www.nexusmods.com/morrowind/mods/46034?tab=files
The Crafting Framework is library that allows modders to quickly and easily implement complex crafting mechanics in Morrowind.
Data: https://www.nexusmods.com/morrowind/mods/51009?tab=files
Ashfall is a camping, survival and needs mod for Morrowind. It uses the latest in MWSE Lua scripting functionality to implement a wide range of mechanics that integrate seamlessly into the game and provide a truly immersive experience.
Data: https://www.nexusmods.com/morrowind/mods/49057?tab=files
Dokumentation: https://github.com/jhaakma/ashfall/wiki
Changes weather chances, including an increasing chance of blight throughout Vvardenfell before the Main Quest is complete. Now includes MWSE version.
Data: https://www.nexusmods.com/morrowind/mods/47904?tab=files
VISUELL [Start] [Inhaltsverzeichnis]
Texturen Pakete [Start] [Inhaltsverzeichnis]
Data: https://www.nexusmods.com/morrowind/mods/50093?tab=files
Upscales every in-game texture with the help of machine learning. 100% vanilla-friendly.1,8 GB
Data: https://www.nexusmods.com/morrowind/mods/46221?tab=files
NPCs [Start] [Inhaltsverzeichnis]
Data: https://www.nexusmods.com/morrowind/mods/49232?tab=files
Main File: Incarnates Overhauled
Data: https://www.nexusmods.com/morrowind/mods/45894?tab=files
Data: https://www.nexusmods.com/morrowind/mods/49232?tab=files
Main File: Yet Another Guard Diversity - Uniform Ordinators
Umgebung [Start] [Inhaltsverzeichnis]
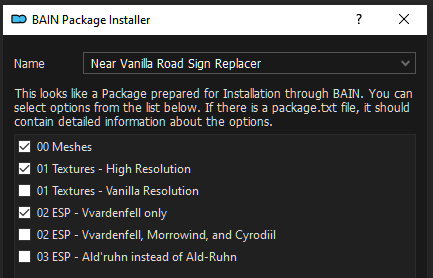
Data: https://www.nexusmods.com/morrowind/mods/43255?tab=files
Um diese LODs im Spiel nutzen zu können, müssen wir in MGE XE den „Distant Land Generation Wizard“ erneut aufrufen.
Data: https://www.nexusmods.com/morrowind/mods/49605?tab=files
Data: https://www.nexusmods.com/morrowind/mods/49678/?tab=files
Data: https://www.nexusmods.com/morrowind/mods/44957?tab=files
Data: https://www.nexusmods.com/morrowind/mods/47190?tab=files
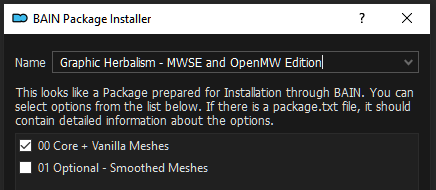
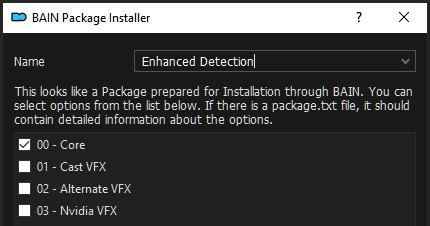
BAIN Installer: 00 Core
Data: https://www.nexusmods.com/morrowind/mods/49232?tab=files
Main File: No-Frills Open Arena
Data: https://www.nexusmods.com/morrowind/mods/48935?tab=files
Achtung: Für diese Mod wird eine texture-Datei „
Textures/alt/atlas_velothi.dds“
von der Mod „Project Atlas“ benötigt, welche nicht mehr im aktuellen
„Project Atlas“ vorhanden ist.
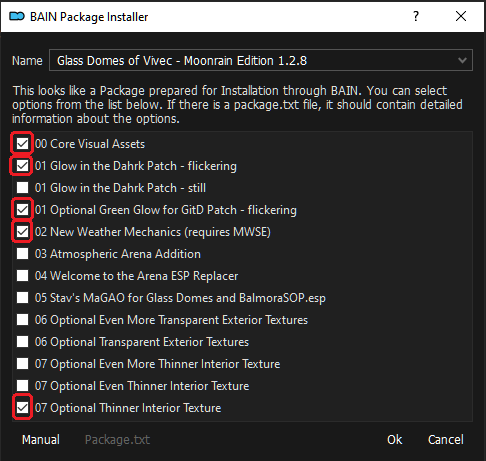
Nach der Diskussion auf https://www.reddit.com/r/OpenMW/comments/wotqs6/project_atlas_missing_texture_mac/ sollte die Datei entweder aus einer älteren Version von „Project Atlas“ kopiert werden, oder es sollte anstelle der beiden Mods „Glass Domes of Vivec – Performance-friendly Open-ish Cantons“ und „Glass Domes of Vivec – Moonrain Edition“ lieber auf die Mod „Mixed cantons of Vivec“ zurückgegriffen werden.
Ich habe die texture-Datei aus „Project Atlas 0.7.0“ von den „inteligent textures“ genommen und als eigene Mod gepackt (siehe Bildschirmfoto).

Data: https://www.nexusmods.com/morrowind/mods/48946?tab=files
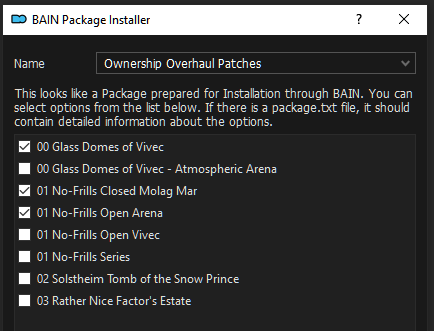
Data: https://www.nexusmods.com/morrowind/mods/49232?tab=files
Main File: Ownership Overhaul Patches
Data: https://www.nexusmods.com/morrowind/mods/46733?tab=files
Bevor wir jetzt weiter machen, kommen wir zu einem seeehr wichtigen Thema!
Lest bitte sehr aufmerksam mit.
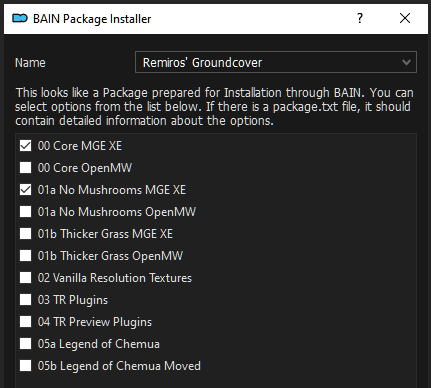
Die Mod „Remiros' Groundcover“ installiert diverse Plugins, die ihr im plugin-panel (rechtes Fenster) des ModOrganizers sehen könnt.
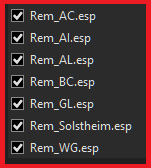
Diese Plugins sollen nicht gelöscht werden.
Diese Plugins sollen auch nicht versteckt werden!
Aber.. diese Plugins müssen deaktiviert sein!!!
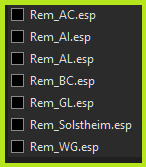
Deaktiviert also jetzt bitte alle Checkboxen von dieser Mod.
Die Plugins sollen deswegen nicht gelöscht werden, weil wir diese Plugins benötigen. Allerdings werden diese Plugins nur von MGE XE benötigt und nicht von der Morrowind.exe beim Starten des Spiels.
Wie Ihr diese Plugins nutzt, um die Pflanzenwelt mittels MGE XE auf den Boden zu bekommen, wird weiter unten im Abschnitt „Distant land wizard erneut starten“ gezeigt.
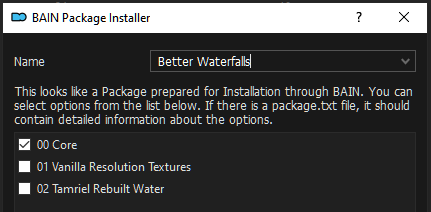
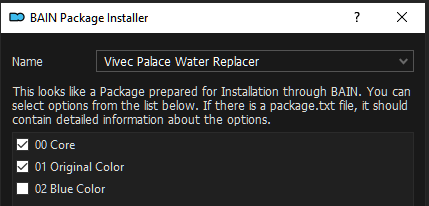
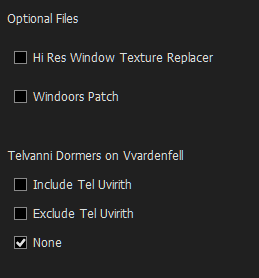
Data: https://www.nexusmods.com/morrowind/mods/48291?tab=files
Main File: Vivec Palace Water Replacer
Visuelle Effekte [Start] [Inhaltsverzeichnis]
Data: https://www.nexusmods.com/morrowind/mods/44322?tab=files
Main File: Mist Retexture
Data: https://www.nexusmods.com/morrowind/mods/4468?tab=files
BAIN Installer: fade
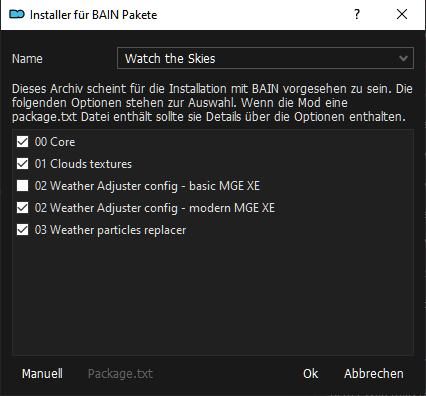
Data: https://www.nexusmods.com/morrowind/mods/47423?tab=files
Wetter und Belichtung [Start] [Inhaltsverzeichnis]
Data: https://www.nexusmods.com/morrowind/mods/45886?tab=files
FOMOD-Installer: Yes, Yes, No, keine Änderungen (siehe Bildschirmfoto)
Im folgenden eine Reihe von Bildschirmfotos aus der Taverne „Herberge zur Mitte“ (halfway tavern). Das Zimmer kann am Tresen bei Drelasa Ramothran zum Schlafen angemietet werden.
In-Game Grafik mit der Mod „Glow in the Dahrk“ zu verschiedenen Uhrzeiten.


Data: https://www.nexusmods.com/morrowind/mods/47912?tab=files
Data: https://www.nexusmods.com/morrowind/mods/48293?tab=files
Data: https://www.nexusmods.com/morrowind/mods/48050?tab=files
Data: https://www.nexusmods.com/morrowind/mods/43023?tab=files
Data: https://www.nexusmods.com/morrowind/mods/43311?tab=files
Optional File: Skies .IV Resource Pack
Wir verstecken (Hide) alle Dateien im Verzeichnis mesches --- außer:
sky_night_02.nif
Data: https://www.nexusmods.com/morrowind/mods/44717?tab=files
Optional Files: Better Night Sky (darker)
Ausrüstung [Start] [Inhaltsverzeichnis]
Data: https://www.nexusmods.com/morrowind/mods/46069?tab=files
Main File: WeaponSheathing1.6-MWSE
Wir setzen mit der rechten Maustaste „Data Files“ „..as directory“.
Data: https://www.nexusmods.com/morrowind/mods/48473?tab=files
Data: https://www.nexusmods.com/morrowind/mods/49616?tab=files
Data:
Ich habe mir noch nicht die Zeit genommen, die ursprüngliche Mod aus dem hier https://www.nexusmods.com/morrowind/mods/52283 anzutreffenden Gesamtpaket (6,9 GB) heraus zu suchen. (Der Download dauert gerade eine Stunde, obwohl ich einen Premium-Account habe.)
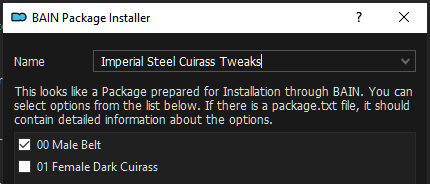
Data: https://www.nexusmods.com/morrowind/mods/49232?tab=files
Main File: Imperial Steel Cuirass Tweaks
Data: https://www.nexusmods.com/morrowind/mods/29281?tab=files
Data: https://www.nexusmods.com/morrowind/mods/50187?tab=files
https://www.nexusmods.com/morrowind/mods/50187?tab=files
Data: https://www.nexusmods.com/morrowind/mods/49673?tab=files
Data: https://www.nexusmods.com/morrowind/mods/50361?tab=files
Verschiedenes [Start] [Inhaltsverzeichnis]
Data: https://www.nexusmods.com/morrowind/mods/43100?tab=files
Data: https://www.nexusmods.com/morrowind/mods/45626?tab=files
BAIN Installer: 00 Core
Data: https://www.nexusmods.com/morrowind/mods/50536?tab=files
Data: https://www.nexusmods.com/morrowind/mods/45124?tab=files
Main File: Gold Coins
Data: https://www.nexusmods.com/morrowind/mods/50170?tab=files
Main File: Intelligent Textures - Simple Golden Gold
AUDIO [Start] [Inhaltsverzeichnis]
Sound Effekte [Start] [Inhaltsverzeichnis]
Data: https://www.nexusmods.com/morrowind/mods/48255?tab=files
1. Main File: AURA 5.1.0 - full (1,18 GB)
2. Update File: AURA 5.1.1 Patch
Hinweis:
Wenn ihr mit einem weiblichen Charakter das Spiel startet, dann hat euer Charakter eine männliche Stimme. Das Problem löst Ihr, indem ihr einmal speichert und das Spiel neustartet.
Data: https://www.nexusmods.com/morrowind/mods/46338?tab=files
Data: https://www.nexusmods.com/morrowind/mods/49654?tab=files
Der Autor empfiehlt, die Lautstärke der Schritte in den Audioeinstellungen des Spiels auf ein Minimum zu stellen.
Data: https://www.nexusmods.com/morrowind/mods/47767?tab=files
Ermöglicht über 100 gesprochene Dialogzeilen für Ladenbesitzer, die im Originalspiel mitgeliefert, aber nie verwendet wurden.
Data: https://www.nexusmods.com/morrowind/mods/49232?tab=files
Main File: No Female Nord Screeching
Data: https://www.nexusmods.com/morrowind/mods/46588?tab=files
Musik [Start] [Inhaltsverzeichnis]
Data: https://www.nexusmods.com/morrowind/mods/46200?tab=files
Data: https://drive.google.com/file/d/1D4HnGG5ud6xhJerEpoFPEnz2N9sW8eJx/view
(2,4 GB zusätzliche Musik aus anderen Spielen)
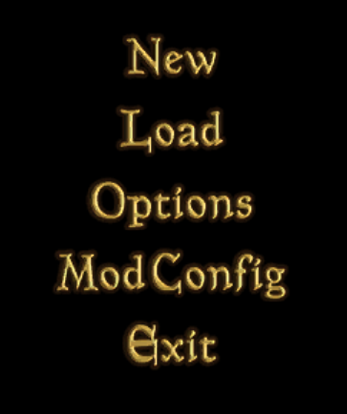
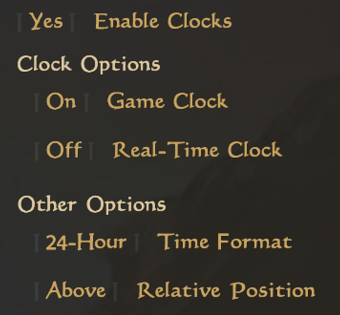
MOD CONFIG [Start] [Inhaltsverzeichnis]
Hier stehen meine in-Game Einstellungen von ModConfig.
General Settings --> Miscellanious -->
[YES] Hunger/Thirst can kill
[NO ] Potions hydrate
Mod Values --> Sleep -->
Tiredness Rate: 20%
Derzeit behalte ich die Standardeinstellungen bei.
Derzeit behalte ich die Standardeinstellungen bei.
Falls es euch zu unrealistisch ist, wenn ihr bereits angezeigt bekommt, dass ein Spiel-Objekt für den weiteren Spieleverlauf wichtig ist, dann könnt ihr in den ModConfig Einstellungen dieser Mod so einiges wieder deaktivieren.
Hier könntet Spiel-Variablen ändern.
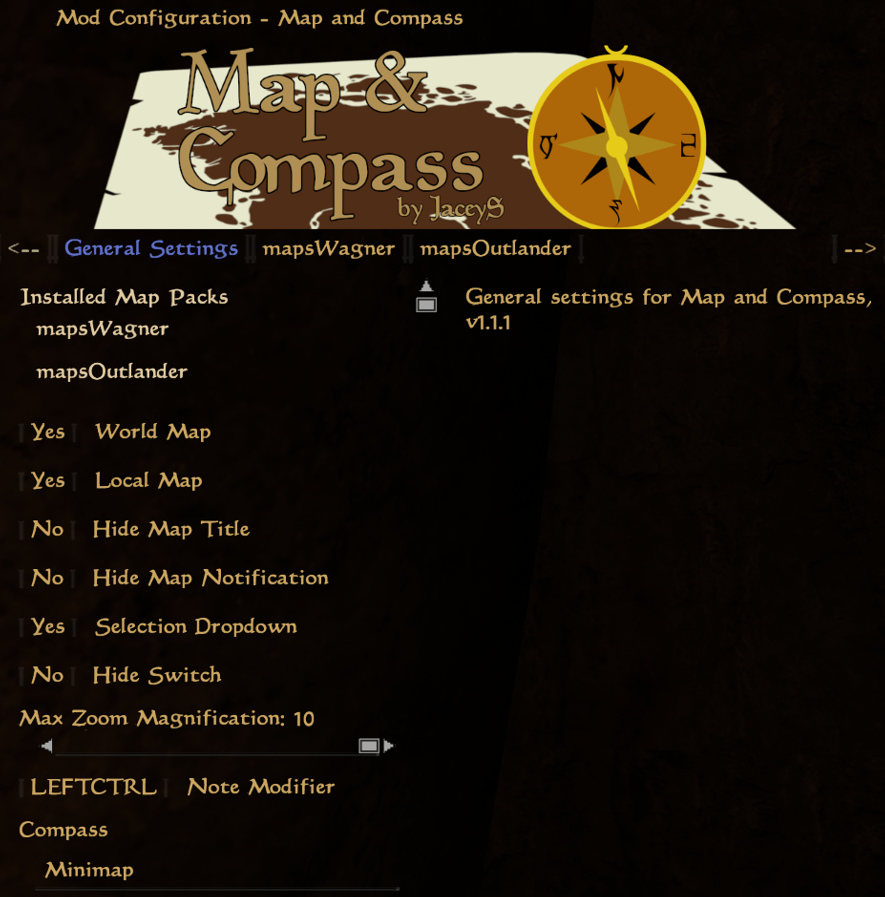
In den aktuellen Einstellungen wird Left-Control (Linke Steuerung-Taste) genutzt, um Notizen auf den Karten hinzuzufügen.
Im zweiten (mapsWagner) und im dritten Reiter (mapsOutlander) könnt ihr weitere Karten hinzufügen, welche ihr dann im Dropdown-Menü der in-Game-Karte benutzen könnt.
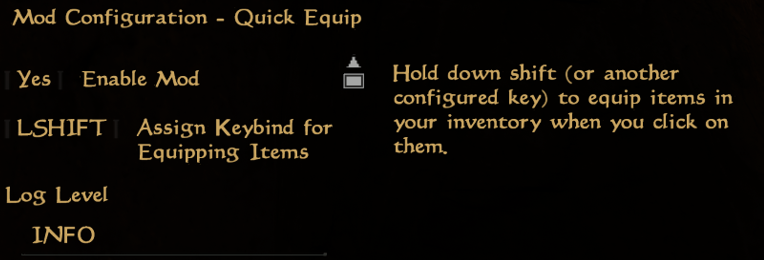
Beim Drücken der linken Shift-Taste wird der Gegenstand aus dem Inventar sofort ausgerüstet oder benutzt (essen, trinken, einnehmen).
Für den Realismus schalten wir folgendes aus (=Off):
[Off] Enable Probe Auto-Equip On Trapped Object Activation